(formerly called "Dialog Types/Patterns/Templates for Web Development")
2nd August 2003
Amended 1st June 2021
As of 10th April 2006 the software discussed in this article can be downloaded from www.radicore.org
For a definition of the underlying motivation behind this article please refer to What are Transaction Patterns? This is also based on a concept called The Power of Component Templates which I first encountered in my previous language.
In a previous article entitled A Development Infrastructure for PHP I wrote that in my methodology I categorise components by their structure, behaviour and content. From this I have been able to create a set of standard patterns or templates which are comprised of the following:
These also represent components in the Model-View-Controller design pattern:
Each different pattern has its own controller script, but several controllers can share the same XSL stylesheet. Each Model can be accessed by any number of patterns.
Each user transaction in the application will have its own Component script which will identify which pattern (controller and view) is to be executed on which database table (model).
The purpose of this document is to describe the various templates/patterns which currently exist in my software library.
In order to create a user transaction from a pattern it is first necessary to import the structure of your application database into the Data Dictionary, then export each table definition to provide a class file which will be used as the Model in the Model-View-Controller design pattern. In the following sections each database table and its associated class file may be referred to as an "entity". While most of the following patterns deal with a single entity there are some which deal with two or more.
From within the Data Dictionary it is then possible to select a table/entity and then generate a transaction, or a family of transactions, from a selection in a dropdown list. The transactions that are generated will be sufficient to perform the basic functionality of moving the data between the database and the user interface, with default data validation. By default the screen structure will contain all fields/columns in the order in which they were defined in the database, but the screen structure file can be easily customised to provide a different layout. The table class file can also be modified to enhance or customise the standard processing, such as the implementation of business rules, by copying any of the empty customisable methods from the abstract table class to the database table class and adding in the required code. The generation process will also add the necessary entries to the TASK, MENU and NAVIGATION_BUTTON tables in the MENU database
This article is also covered by a video titled What are Transaction Patterns and how are they used to achieve Rapid Application Development?
Rather than have large complex components which can perform several functions I much prefer to build small simple components which perform a single function each. While this does increase the number of components within an application it also increases the amount of reusable code which results in faster development times. Thus to maintain the contents of a typical database table where I need to provide the functions to list, search, insert, update, enquire and delete I create a family of components which is arranged in the structure shown in Figure 1. Note that these constitute six separate user transactions each of which has its own Controller and not a single user transaction which so many programmers still insist on using. I gave up on that idea in the 1980s, as documented in Component Design - Large and Complex vs. Small and Simple.
Figure 1 - A typical Family of Forms
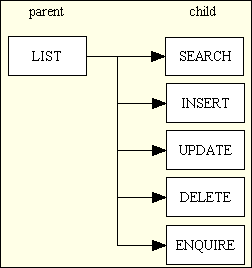
Each of the boxes in the above diagram is a clickable link. Please note the following:
Except for the INSERT the child component will need the primary key of an occurrence in the parent component before it can load any data on which it is supposed to act. In this case the required occurrence in the parent screen must be marked as selected using the relevant checkbox before the link/button for the child component is pressed. Note that it is possible to select multiple rows before jumping to the child screen, in which case the child screen will include a scrolling area so that you can scroll through the selected rows one at a time.
It should be noted that in my web development environment all HTML output is produced by XSL transformations using XML files created by the Dialog Type scripts. Each component will therefore require its own Component script to specify the content as well as an XSL file to display that content. Another area of reuse I have managed to achieve is for several components to share the same XSL file, as shown in Figure 2.
Figure 2 - Sharing XSL files
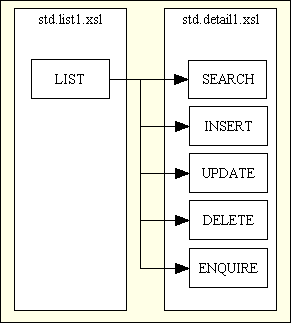
Note: each of the boxes in the above diagram is a clickable link.
The parent screen (LIST) shows data for multiple database occurrences in summary form, with each occurrence taking up one line going across the screen with one set of column headings at the top. The child screens (SEARCH, INSERT, UPDATE, DELETE and ENQUIRE) shows data for a single database occurrence in detail form going down the screen, with a label in front of each field. As the child screens have an identical structure they can all share the same XSL file.
In my original infrastructure each database table required its own version of the list.xsl and detail.xsl files as the table, field names and field labels had to be hard-coded inside them, but I have since enhanced my XSL library so that a small number of generic stylesheets can be used for any number of database tables. This is documented in Reusable XSL Stylesheets and Templates and uses updated versions of my std.list1.xsl and std.detail1.xsl stylesheets which allow the table name(s), field names and field labels to be passed in as part of the XML data.
The following sections contain references to the screen area. This is the area within the browser window running on the client device which the software may fill with data. It must be remembered that each client may have a different screen resolution, so that what fits easily into a screen at one resolution may need scroll bars in another. It must also be remembered that users may alter their browser's font size which may also affect how much data can be displayed without the need for scroll bars.
It is not possible to dictate either the screen resolution or the font size used by individual clients, nor is it practicable to limit the amount of data generated by individual forms to fit the smallest screen window that may be encountered. What is important is to output enough data to make each screen usable based on the average screen resolution and default font size that are currently in use. On some clients this may leave areas of empty space while on others it will overflow the available area and require the use of scroll bars. This is a fact of life which cannot be avoided. Unless, of course, the framework provides a responsive interface which will alter the screen layout depending on the size of the screen being used.
All the screen layouts in the following sections are shown broken down into separate areas or zones where the data for some zones is provided automatically by the framework while others are provided by application components. The following zones are provided by the framework:
The following zone is provided by the application:
Menu buttons are defined on the MENU table within the MENU database. They are shown as a series of hyperlinks at the top of the screen which allow the user to navigate around different parts of the system. These links are shown in two rows, as in the following example:
Menu Bar with text links

The text on the top row can be changed to images as in the following:
Menu Bar with image links

The top row shows the current logon identity on the left, with a series of hyperlinks on the right:
The ability to change the text into images is documented in FAQ99.
The middle row is the current set of menu options. If you click an option which is a sub-menu then the whole list of options will change. If you click an option which is not a menu then the whole area below the menu bar will change to reflect the requirements of that option. The background colour of that option in the menu bar will then change to be the same as the second row to signify that it is 'active'. The other options will have a different background color to signify that they are 'inactive'.
The bottom row of the menu bar will trace the route from the starting page to the current page. This list is sometimes known as 'breadcrumbs' as it allows the user to find his way home if he gets lost. As each new task is selected it will be added to the list. When a task is terminated it will be removed from this list. An item in this list will be available as a hyperlink if it is different from the current page.
This exists between the Menu Bar and the Navigation Bar. In most cases the screen title is shown on its own, as in the following:
Title Bar
In some cases the task may be configured (see FAQ145 for details) to include a QuickSearch bar, as in the following:
Title Bar with QuickSearch Bar
This is a quicker alternative to the separate SEARCH screen. The QuickSearch bar is comprised of the following elements:
If you select a field name from the dropdown list, enter a value into the text box, then press the SEARCH button, this will cause the task to retrieve data which matches this search criteria and refresh the screen display with the first page of available data.
Navigation buttons are defined on the NAV_BUTTON table within the MENU database. They are shown as a series of buttons in an area immediately below the Title & QuickSearch Bar. They are similar to menu buttons in that they pass control to other tasks within the system, but as each parent task has its own set of navigation buttons for child tasks, it is possible to pass context from the parent to the child task.
Navigation Bar

The top row contains buttons which can be pressed without selecting any items from within the body of the current screen. These will typically be:
| NEW | This will bring up a blank detail screen which will allow a new occurrence of the current entity to be added to the database. |
| SEARCH | This will bring up a detail screen which will allow a variety of selection criteria to be defined so that the number of rows retrieved from the database can be reduced. |
| PREVIOUS SEARCH | If search criteria has already been defined for the current database table then this button will activate that search criteria. |
Upon returning from a SEARCH screen the page number will be reset to 1, and any column sorting settings will be cleared. New data will be retrieved from the database using the search criteria, and will be presented in the default sort sequence starting at page 1.
The bottom row contains buttons which cannot be pressed without selecting one or more items from within the body of the current screen. These will typically be:
| READ | This will bring up a detail screen which will show all current data for a single database occurrence. This will be 'read' only. |
| UPDATE | This will bring up a detail screen which will show all current data for a single database occurrence and allow that data to be amended. |
| DELETE | This will bring up a detail screen which will show all current data for a single database occurrence. This will have a 'submit' button which will cause that occurrence to be deleted. |
| <other> | This will bring up another child screen which contains data from other database tables which are related to the selected occurrence. |
This selection process enables the primary key(s) of the selected occurrence(s) to be passed down to the child form so that they know which occurrences to process.
Upon returning from a child function the parent function will re-retrieve its data according to the current settings (page number, sort sequence, etc). This is so that any changes made by the child function can be included in the screen display.
The middle row contains a series of options which act upon the body of the current screen. These options are:
| select all | This will set all the selection checkboxes for all rows in the current screen to ON. This option is not available when the SELECT column contains radio buttons as only a single selection can be made. |
| unselect all | This will set all the selection checkboxes for all rows in the current screen to OFF. This option is not available when the SELECT column contains radio buttons as only a single selection can be made. |
| locked | If this checkbox is set to ON it will cause the selection to be locked so that when returning to the screen the selected records will be automatically re-selected. This is done by storing the primary keys of the selected rows, so that when the screen is rebuilt any row in the display which has a stored primary key will have its selection checkbox set to ON.
By default this is OFF, which means that selections are not saved. This is a global setting, which means that it is either ON or OFF for all screens, not just the current screen. |
| show nn | This will alter the number of rows that will be displayed in each 'page'. Be warned that the larger the number the longer it will take for the page to load, and the more scrolling you will have to do to reach the action buttons. These options are not available if the page size cannot be altered. |
| (of nn) | This is the total number of rows available with the current search criteria. |
It is possible to prevent these parts from being displayed with the following settings in your code:
    $this->xsl_params['noselect']  = 'y';  // remove 'select all/unselect all ' hyperlinks
    $this->xsl_params['noshow']    = 'y';  // remove 'show 10/show 25/...' hyperlinks
On screens which show multiple rows with headings above each column, such as in List 1 and List 2, the column headings may be shown as hyperlinks, as in the following example:
Column Headings
If the number of available rows is not 2 or more then the column headings will be shown as plain text, not hyperlinks, as there will be no point in sorting only 1 row.
If one of these hyperlinks is pressed it will cause the current page to be regenerated after the data is sorted on the selected column. Note that this causes all data which satisfies the current selection criteria to be sorted, not just the data on the current page. An image will appear next to the column heading to indicate that the data has been sorted on this column. If this or any other such hyperlink is pressed again it will cause the sort sequence to alternate between ascending and descending, with the image next to the heading being switched accordingly.
Any column sorting can be cleared by using the RESET button in the action bar.
There are two ways to prevent a column heading from becoming a hyperlink for sorting:
$this->xsl_params['nosort'] = 'y'; // remove sort hyperlinks in column headings
'nosort' => 'y' option in the screen structure file, as in:
$structure['inner']['fields'][] = array('node_desc' => 'Description', 'nosort' => 'y');
The way that data is displayed in this area depends on whether it is capable of displaying single or multiple occurrences (rows).
| Single | The data for a single occurrence will be displayed vertically, with labels on the left and data on the right. The field value will be shown in the right-hand column while a suitable label will be shown in the left-hand column, as in the following: 
For functions which allow inserts or updates an asterisk in front of a label is used to indicate that the field cannot be left empty. If there is an error with the user's input a suitable error message will be shown immediately under the offending data. Other screen layouts are also available. For example, you can have more than one piece of data in a single line, as in the following: 
It is even possible to have data spanning more than one line, as in the following: 
For details on how these different layouts can be specified please refer to XSL Structure files in The Model-View-Controller (MVC) Design Pattern for PHP. |
| Multiple | The data will be displayed horizontally, one occurrence per line. Each field will be shown in a separate column, and above each column will be a set of column headings, as in the following: 
Alternate rows will be shown with a different background colour to help them stand out from each other. The first column will usually be a checkbox or radio button which has different uses depending on the type of function:
It is possible to modify certain aspects of this display at runtime. Please refer to: |
Messages related to a particular field will usually appear immediately below the field's data in the data area. There may be circumstances where there is a message which cannot be attached to any field on the current screen, or where there is a general message or instruction. In this case such messages (as there may be more than one) will appear immediately below the data area.
In screens of type Delete 1, for example, this area will either display a confirmation message or it will give a reason why the record cannot be deleted.
For some screens there may be more records available than can be displayed at any one time (see LIST 1 and LIST 2 for examples). In this case the number of available rows will be broken down into manageable 'pages' and a pagination area will be made available which will allow the user to move forwards and backwards through the available pages. The number of rows per 'page' is governed by a variable within the class for each database table, but this may be altered at run-time by choosing one of the options in the middle row of the navigation bar.
There are two display options which are available, governed by the Pagination Width setting on the Menu Control Record. If this value is zero then the default display will be used.
Pagination area (default display)
If the value is greater than zero then a 'Google style' display will be used.
Pagination area (Google style display)
The pagination area is broken down into the following sections:-
| «FIRST ‹PREV | If the current page number is greater than 1 then these will be shown as hyperlinks which will cause the function to go back to either the FIRST or PREVIOUS page. |
| Page X of Y | (default display) Shows the current page number (X) and the total number of pages available (Y). |
| Page A B C of Y | (Google style display) Shows a number of entries for individual pages (A, B, C) and the total number of pages available (Y). The current page will be shown in bold while those either side will be hyperlinks. The number of pages either side of the current page will be governed by the value for Pagination Width on the Menu Control Record. |
| NEXT› LAST» | If the current page number is not the last then these will be shown as hyperlinks which will cause the function to go forward to either the NEXT or LAST page. |
There may be screens in which it is possible to step through a series of selected or available items (see Delete 1, Enquire 1, List 2, Multi 2 and Update 1 for examples) either as well as or instead of the usual pagination options. In this case there will need to be a separate area to control the movement between the selected/available items. This 'scrolling' will usually be for one occurrence (item) at a time rather than multiple occurrences, and will only be shown when multiple occurrences are actually available.
Note that there may be more than one scrolling area to a page (as in Multi 2), so each area will be placed immediately below the data to which it relates.
There are two display options which are available, governed by the Scrolling Width setting on the Menu Control Record. If this value is zero then the default display will be used.
Scrolling area (default display)
If the value is greater than zero then a 'Google style' display will be used.
Scrolling area (Google style display)
The scrolling area is broken down into the following sections:-
| «FIRST ‹PREV | If the current item number is greater than 1 then these will be shown as hyperlinks which will cause the function to go back to either the FIRST or PREVIOUS item. |
| Item X of Y | (default display) Shows the current item number (X) and the total number of items available (Y). |
| Item A B C of Y | (Google style display) Shows a number of entries for individual items (A, B, C) and the total number of items available (Y). The current item will be shown in bold while those either side will be hyperlinks. The maximum number of items either side of the current item will be governed by the value for Scrolling Width on the Menu Control Record. |
| NEXT› LAST» | If the current item number is not the last then these will be shown as hyperlinks which will cause the function to go forward to either the NEXT or LAST item. |
These buttons are defined within the controller script for each dialog type as they allow the user to choose an action which that controller is able to perform, such as updating the database, terminating the screen, or resetting the selection criteria. These buttons are situated in an area at the bottom of the screen.
Action Bar
The SUBMIT button(s) will be on the left while any other buttons will be on the right. The number of buttons will vary according to the circumstances.
| CHOOSE | After selecting one or more occurrences in the current screen, usually by setting a checkbox, this will pass the selection back to the previous screen for processing. |
| CHOOSE NULL | This will cause the current selection in the parent screen to be nullified or cleared. This is different from the 'Cancel' button which will terminate the popup process without making a selection, thus leaving any current selection unchanged. This option is not available in popups which allow multiple selections. |
| CANCEL/CLOSE | Terminate the current function without performing any action and return to the previous function. (NOTE: this is NOT the same as using the browser's 'back' button) |
| RESET | Reset any search, sort or page settings to their original values and re-retrieve the data as if the function were being started afresh. |
| SUBMIT | Attempt to update the database using the current data. If any errors are encountered a suitable error message will be displayed underneath the offending field. If there are no errors then control will be returned to the previous function. |
| SUBMIT+stay | Attempt to update the database using the current data. If any errors are encountered a suitable error message will be displayed underneath the offending field. If there are no errors then stay on the current record. |
| SUBMIT+next | Attempt to update the database using the current data. If any errors are encountered a suitable error message will be displayed underneath the offending field. If there are no errors then skip to the next record (if available). |
| COPY | Copy the current screen contents into memory so that it can be pasted into a subsequent screen. |
| PASTE | If data for the current database table has been copied into memory then this button will paste that data into the current screen. |
The text which appears underneath the action bar is described in Version Number.
There may be several application subsystems running under the Radicore menu system, and it is sometimes useful to know the version number of each of those subsystems. This is now an optional feature which is activated by placing a file called version.txt in the subsystem directory. If such a file is found when running a script from within that subsystem then its contents will be retrieved and displayed at the bottom of the screen underneath the action bar. The contents of this file should be a text string of up to 40 characters.
It is sometimes a requirement that an application is able to operate in more than one language. This can be a problem if all text, such as titles, labels and messages, is hard-coded within the application. It is far less of a problem if this text is maintained in separate text files as this gives the ability to modify the text in those files without modifying the application. Whenever the application requires a piece of text it uses an API which, when given the identity of the text and a language code, will retrieve that text in the required language and return it to the application.
In the Radicore framework all text is maintained in a separate 'text' directory, with a separate subdirectory for each language code. Each file therefore contains text in a single language. Adding a new language to the application is as simple as 1-2-3:
Obtaining the user's language code is simple in a web application. The user can define his/her preferred language in the browser settings, and this information is made available to the application on the server through the HTTP_ACCEPT_LANGUAGE variable.
This is explained in more detail in Internationalisation and the Radicore Development Infrastructure (Part 1) and Part 2.
When a pattern which reads from the database contains several table objects, such as LIST2 and LIST3, it will start its data retrieval at the outermost (parent) table before it proceeds to the innermost (child) table. If multiple rows from the outer entity are retrieved they will be shown one at a time, and a scrolling area will be shown to allow the user to traverse through the other rows. The retrieval on the inner table will be restricted to those records which are associated with the current row of the outer table. In other words, the primary key of the outer table will be used to obtain the foreign key on the inner table. This is done by calling the getForeignKeyValues() function which will attempt to find the correct primary-to-foreign key relationship between these two tables using the contents of the $parent_relations array in the child object. Before it returns it will call the _cm_getforeignkeyvalues() method in the child object in case any adjustments to the foreign key need to be made. The foreign key for the inner/child table will be extracted into a string such as:
fieldname='value'
  or for composite keys:
fieldname1='value' AND fieldname2='value'
This string will then be passed to the child table as the $where argument on the call to getData().
When passing control from one task to another by means of a navigation button the getForeignKeyValues() function cannot be used as neither task knows the identity of the other's table. The primary key of the selected row(s) in the parent task will be extracted into a $where string and passed to the child task. Note that the Radicore framework assumes that the field names in the primary key of the outer/parent table are exactly the same as the field names in the foreign key of the inner/child table. If they are not then you will have to modify the $where string manually in the _cm_pre_getData() method using code such as the following:
$where = str_replace('node_id=', 'node_id_snr=', $where);
These functions will enable the user to add new entries to the database.
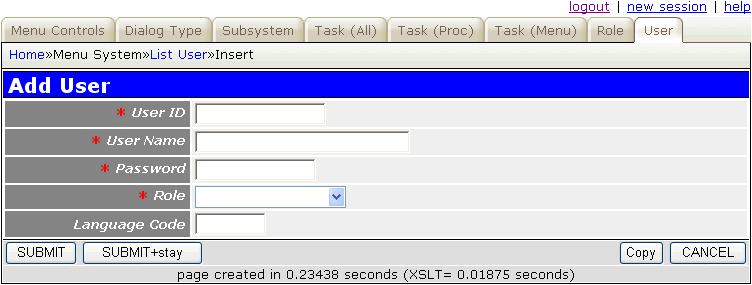
This is typically called from a LIST 1 task in order to add 1 new row at a time to the database. Upon initial entry this screen will usually be blank, but some fields may be shown with default or initial values.
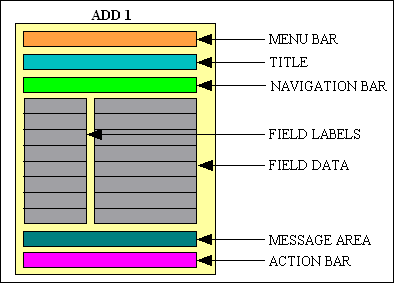
This screen contains the following areas:-
| Menu bar | This will show the menu options which led to this screen. |
| Title | This is supplied at runtime. |
| Navigation Bar | This is usually empty for this type of function. |
| Data Area | As this area is for a single occurrence the data will be shown vertically, one field per line, with data on the right and labels on the left. |
| Message Area | This will contain any messages or instructions. |
| Action Bar | This area will contain the following buttons:-
|
Add 1 screenshot
| GET method (initial) |
|
| GET method (subsequent) |
|
| SUBMIT button | |
| POPUP button | |
| CUSTOM button | |
| JavaScript submit() NAVIGATION button |
|
| CANCEL button | |
| build HTML | |
| Click here for a UML diagram | |
This screen has a similar layout to the ADD 1 screen, but is called from a LIST 2 task. Upon initial entry this screen will retrieve the parent details as identified in the previous function and show them as read-only at the top of the data area. The remaining details will usually be blank, but some fields may be shown with default or initial values.
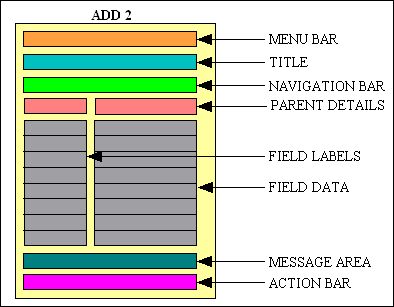
This screen contains the following areas:-
| Menu bar | This will show the menu options which led to this screen. |
| Title | This is supplied at runtime. |
| Navigation Bar | This is usually empty for this type of function. |
| Parent Details | These are details from the parent record as identified in the previous function. These cannot be amended. |
| Data Area | As this area is for a single occurrence the data will be shown vertically, one field per line, with data on the right and labels on the left. |
| Message Area | This will contain any messages or instructions. |
| Action Bar | This area will contain the following buttons:-
|
Add 2 screenshot
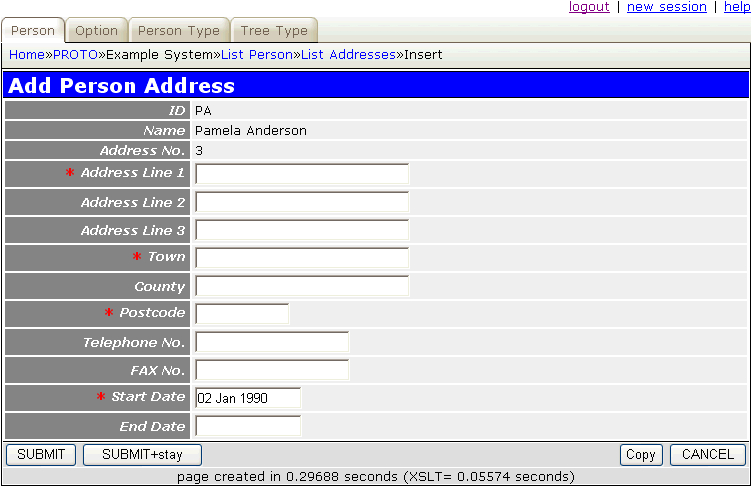
| GET method (initial) |
|
| GET method (subsequent) |
|
| SUBMIT button | |
| POPUP button | |
| CUSTOM button | |
| JavaScript submit() NAVIGATION button |
|
| CANCEL button | |
| build HTML |
This function does not have a visible screen. It is used to add occurrences to the link entity which exists in the middle of a MANY-to-MANY relationship. This is called by a parent function which passes it the identity of an occurrence from one of the MANY tables. This function will then call a popup screen which will allow the user to select one or more occurrences from the second MANY table. This function will then use the identity from the first MANY table with the selection list from the second MANY table to add new occurrences to the intermediate link table (using multiple calls to the insertRecord() method).
This process is represented in Figure 3.
Figure 3 - The processing of an ADD 3 function
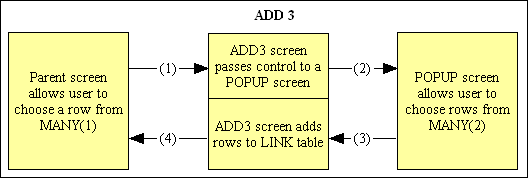
Note that in order to switch the popup screen from allowing you to choose a single occurrence (where the SELECT column contains multiple radio buttons), to choosing multiple occurrences (where the SELECT column contains multiple checkboxes) you must change the contents of the _cm_popupCall() method so that $settings['select_one'] is FALSE. This will also cause the CHOOSE NULL button to be removed from the popup screen.
| Initial entry | |
| Re-entry |
|
| build HTML |
This function does not have a visible screen. It is used to add one or more occurrences to a database table using information passed down from the parent screen. This information is used in the getInitialDataMultiple() method to construct an array of entries which is then added to the database using the insertMultiple() method. Upon completion it will return control to the parent screen.
Working examples can be found in the Data Dictionary subsystem with the Import Databases, Import Table and Import Columns functions.
Note that the insertMultiple() method can also perform updates and deletes as well as inserts.
| Initial entry |
This function allows several child occurrences to be added to a selected parent occurrence with a single input screen. Upon initial entry this task will retrieve the parent details as identified in the previous function and show them at the top of the data area. The contents of this area may be modifiable, or may be set to 'noedit'. A number of blank rows will be shown below the column headings in the child area which the user can fill in before pressing the submit button.
By default the number of blank rows which is first displayed in the child area is determined by whatever code is in the getInitialDataMultiple() method. During the execution of the script it is possible to include custom buttons to add or remove rows from this area as documented in FAQ156.
Note that the insertMultiple() method call also perform updates and deletes as well as inserts.
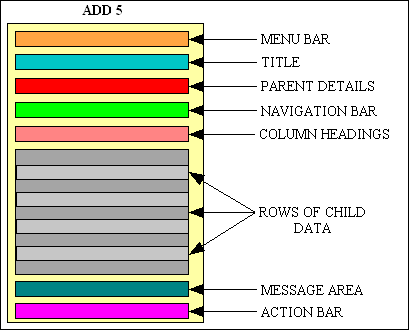
This screen contains the following areas:-
| Menu bar | This will show the menu options which led to this screen. |
| Title | This is supplied at runtime. |
| Navigation Bar | This is usually empty for this type of function. |
| Parent Details | These are details from the parent record as identified in the previous function. These may be amended. |
| Column Headings | These will be plain headings, not hyperlinks, as the data does not yet exist on the database and therefore cannot be sorted. |
| Data Area | As this area is for multiple occurrences the data will be shown horizontally, one occurrence per line. The number of blank rows available will be determined by the getInitialDataMultiple() method. The ability to add or delete rows dynamically may be added by following the procedure described in FAQ156. |
| Message Area | This will contain any messages or instructions. |
| Action Bar | This area will contain the following buttons:-
|
Add 5 screenshot
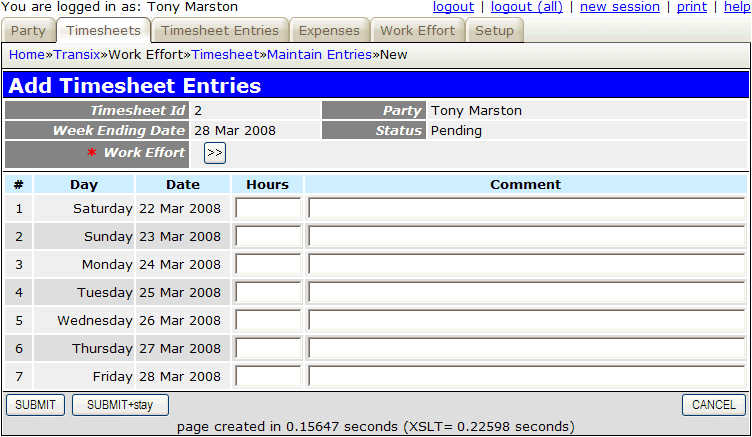
| GET method (initial) |
|
| GET method (subsequent) |
|
| SUBMIT button |
|
| POPUP button |
|
| CUSTOM button |
|
| JavaScript submit() NAVIGATION button |
|
| CANCEL button | |
| build HTML |
Where there are two tables in a parent-child relationship this function will allow a new record to be added to the parent table and a single record to be added to the child table in a single operation. This avoids the need to have separate tasks to add records to each table.
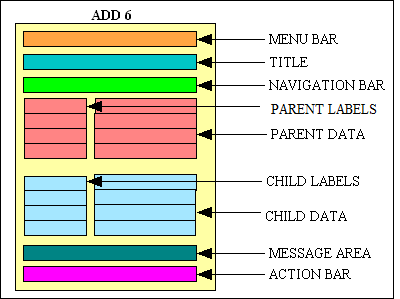
This screen contains the following areas:-
| Menu bar | This will show the menu options which led to this screen. |
| Title | This is supplied at runtime. |
| Navigation Bar | This is usually empty for this type of function. |
| Parent Details | As this area is for a single occurrence the data will be shown vertically, one field per line, with data on the right and labels on the left. Each field will initially be empty. |
| Child Details | As this area is for a single occurrence the data will be shown vertically, one field per line, with data on the right and labels on the left. Each field will initially be empty. |
| Message Area | This will contain any messages or instructions. |
| Action Bar | This area will contain the following buttons:-
|
Add 6 screenshot

| initial entry |
|
| re-entry | |
| SUBMIT button |
|
| Javascript submit() |
|
| CUSTOM button |
|
| CANCEL button |
|
| build HTML |
|
This is similar to Add 6 but will allow multiple entries to be added to the child table.
By default the number of blank rows which is first displayed in the child area is determined by whatever code is in the getInitialDataMultiple() method. During the execution of the script it is possible to include custom buttons to add or remove rows from this area as documented in FAQ156.
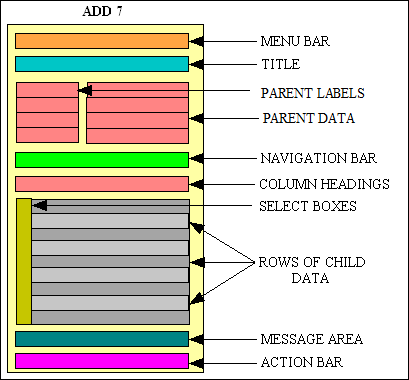
This screen contains the following areas:-
| Menu bar | This will show the menu options which led to this screen. |
| Title | This is supplied at runtime. |
| Navigation Bar | This is usually empty for this type of function. |
| Parent Details | As this area is for a single occurrence the data will be shown vertically, one field per line, with data on the right and labels on the left. Each field will initially be empty. |
| Column Headings | These will be plain headings, not hyperlinks, as the data does not yet exist on the database and therefore cannot be sorted. |
| Data Area | As this area is for multiple occurrences the data will be shown horizontally, one occurrence per line. The number of blank rows available will be determined by the getInitialDataMultiple() method. The ability to add or delete rows dynamically may be added by following the procedure described in FAQ156. |
| Message Area | This will contain any messages or instructions. |
| Action Bar | This area will contain the following buttons:-
|
Add 7 screenshot

| initial entry |
|
| re-entry | |
| SUBMIT button |
|
| Javascript submit() |
|
| CUSTOM button |
|
| CANCEL button |
|
| build HTML |
|
All other patterns in this catalogue are for tasks which are run from within the web browser, but they must be completed within a time limit otherwise the processing will be aborted. If a script needs to run for a longer time one option is to run it from the command line in which case there is no time limit. See FAQ56 for details on how to set up a batch job. As well as via the command line, this type of job can also be initiated via a cron job which will run it at scheduled times.
This type of task will allow a batch job to be initiated from within the web browser by a navigation button. The generated script must follow the guidelines which are outlined in FAQ56. When the navigation button is pressed to activate this task the following events will take place:
$script_name PHPSESSID $session_id $extra_args"$script_name' PHPSESSID $session_id $extra_args >/dev/null &"Note that this task cannot have any dialog with the user, although it is possible to pass it any selection and sorting criteria from the current task.
Note also that while it is possible for a batch task to activate another task this other task must also be a batch task which calls the batchInit() function and not the initSession() function. There are some page controller scripts which can be run in both online and batch modes as these contain the following lines of code:
if (preg_match('/cli/i', php_sapi_name())) {
    // being run from the command line, so initialisation has already been done
    $batch_errors = null;
} else {
    require_once 'include.general.inc';
    initSession();      // load session variables
} // if
The page controller script can then be called from a component script as shown in the following example:
$stdout = '../logs/inventory_item(csv).html';
$csvout = '../logs/inventory_item.csv';

ini_set('include_path', '.');
require 'std.batch.inc';

batchInit(__FILE__);

// custom code starts here
$table_id = 'inventory_item_s03';   // table name
require 'std.output1.inc';          // activate page controller
// custom code ends here

batchEnd();
These functions will enable the user to delete entries (or remove links to entries) from the database.
Upon initial entry this function will retrieve a record from the database using the primary key(s) passed down by the previous form. It will then use the $child_relations array in the database object to check if any subordinate entries exist on any related database tables which will prevent the deletion from continuing. If there are any such constraints then an error message will be generated.
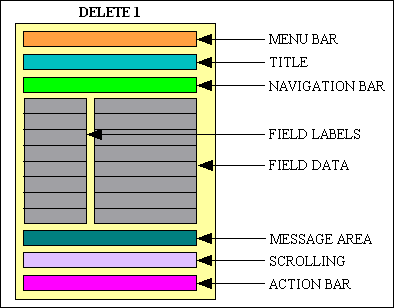
This screen contains the following areas:-
| Menu bar | This will show the menu options which led to this screen. |
| Title | This is supplied at runtime. |
| Navigation Bar | This is usually empty for this type of function. |
| Data Area | As this area is for a single occurrence the data will be shown vertically, one field per line, with data on the right and labels on the left. |
| Message Area | This displays either the message "Press SUBMIT to confirm deletion" in order to give the user the opportunity to cancel/confirm the deletion, or it gives the reason why the record cannot be deleted. |
| Scrolling Area | This will provide options to scroll forwards and backwards through the selected items. |
| Action Bar | This area will contain the following buttons:-
|
Delete 1 screenshot
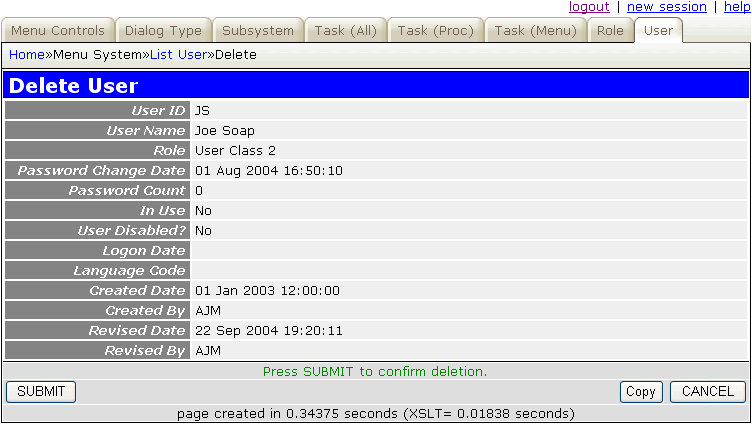
If it is necessary to prevent everyone except the record's creator from deleting the record this can be achieved by putting the string created_user=$logon_user_id into the SETTINGS field for the task.
| GET method | |
| SUBMIT button | |
| build HTML | |
| Click here for a UML diagram | |
This function does not have any dialog with the user. It receives an array of primary keys which were selected in the previous form, deletes them one at a time using the deleteMultiple() method, then passes control back to the previous form with a message saying how any occurrences were actually deleted. This type of function is usually used to delete occurrences from a LINK entity created by an ADD 3 form.
| Initial entry |
This function is similar to DELETE 2 in that it has no screen dialog, but instead of receiving an array of primary keys it receives selection criteria which may identify any number of occurrences from the specified database table. These occurrences are then updated in a single operation (using the deleteSelection() method), usually by nullifying the column(s) that caused them to be selected in the first place. This is the reverse of a UPDATE 2 function.
| Initial entry |
This is similar to a LIST 2, but will allow the current occurrence of the parent table, plus all related occurrences on the child table, to be deleted.
Upon initial entry this function will retrieve the first of the selected occurrences from the ONE (parent) table, then retrieve associated rows from the MANY (child) table and display them starting at page 1. It will then use the $child_relations array in the parent database object to check if there are any other restraints which will prevent the deletion from continuing. If there are any such constraints then an error message will be generated.
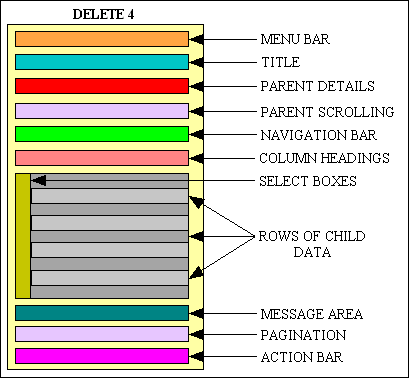
This screen contains the following areas:-
| Menu bar | This will show the menu options which led to this screen. |
| Title | This is supplied at runtime. |
| Parent Details | Details of the parent entry which was selected in the previous function. All child entries are related to this parent. |
| Parent Scrolling | This will provide options to scroll forwards and backwards through the selected parent items. |
| Navigation Bar | This may contain any buttons which are deemed appropriate for this function, among which may be:-
|
| Column Headings | These will be shown as hyperlinks so that the user can choose to have the data sorted by any column. |
| Data Area | As this area is for multiple occurrences the data will be shown horizontally, one occurrence per line.
The select box on each line will be used to pass the primary key of that occurrence to the function associated with a button on the navigation bar. |
| Message Area | This will contain any messages or instructions. |
| Pagination | This area will allow the user to move forwards and backwards through the available 'pages' of data. |
| Action Bar | This area will contain the following buttons:-
|
Delete 4 screenshot
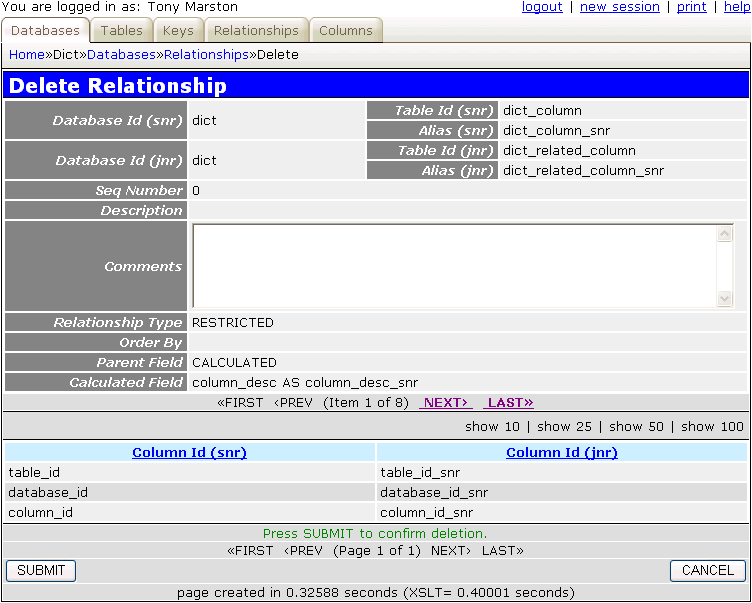
| GET method | |
| SUBMIT button | |
| build HTML |
This function is similar to DELETE 1, but instead of stopping if any occurrences on a child table are found for which the delete constraint is set to RESTRICTED it will instead act as if the constraint were set to CASCADE. This will cause ALL child occurrences, and the children of those children all the way down to the bottom of the relationship hierarchy, to be deleted from the database.
Note: this will only erase data from tables which exist in databases which belong to the current subsystem. For example, when erasing a MNU_SUBSYSTEM entry from the MENU database it will not affect related tables in either the DICT database or the WORKFLOW database.
The value of the audit logging flag $this->audit_logging in the initial table object will be passed down the hierarchy to each child object. If set to TRUE then all deleted records will appear in the audit log. If set to FALSE then no deleted records will appear in the audit log. Regardless of what value has been defined for this flag in normal operations an alternative value can be defined in the _cm_pre_eraseRecord() method which will take effect for the current operation only.
Due to the large number of records that can be deleted with a function of this type it should only be created where absolutely necessary, and access permissions should only be granted to responsible personnel. It would also be a good idea to have some sort of export function so that the data can be reinstated if required.
| GET method | |
| SUBMIT button |
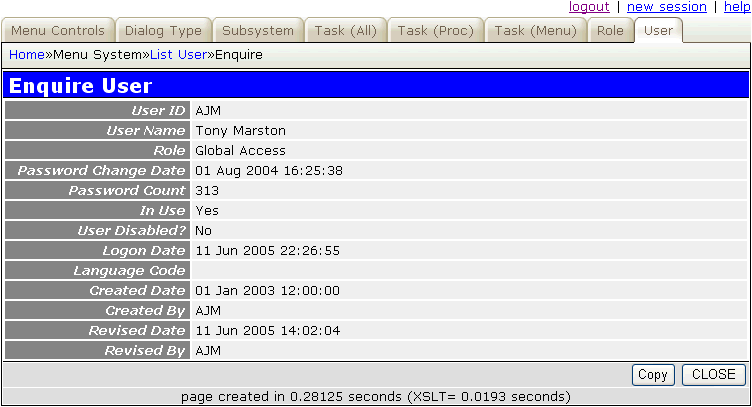
This type of function will allow the user to view details from the database. No type of update is allowed.
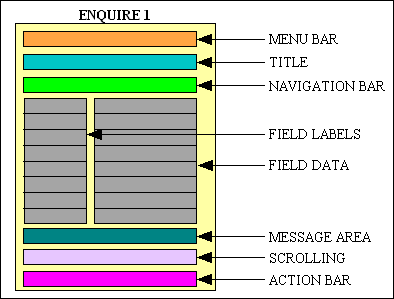
Upon initial entry this function will retrieve a record from the database using the primary key(s) passed down by the previous form.
This screen contains the following areas:-
| Menu bar | This will show the menu options which led to this screen. |
| Title | This is supplied at runtime. |
| Navigation Bar | This is usually empty for this type of function, but may contain buttons which will allow the user to select other functions which show more details related to the current occurrence. |
| Data Area | As this area is for a single occurrence the data will be shown vertically, one field per line, with data on the right and labels on the left. |
| Message Area | This will contain any messages or instructions. |
| Scrolling Area | This will provide options to scroll forwards and backwards through the selected items. |
| Action Bar | This area will contain the following button:-
|
Enquire 1 screenshot
| GET method | |
| Click here for a UML diagram | |
This type of form is used to display multiple occurrences (rows) of a database table. It shows summary details only, one entry per line. It does not allow any updates, but a series of navigation buttons will provide access to other forms/functions/screens that should be able to add, update or delete occurrences of the table.
In these forms the total number of rows may too large to display in a single page, therefore each page may be limited to a certain number of rows. In this case pagination options will be made available which will allow the user to select a particular page to display.
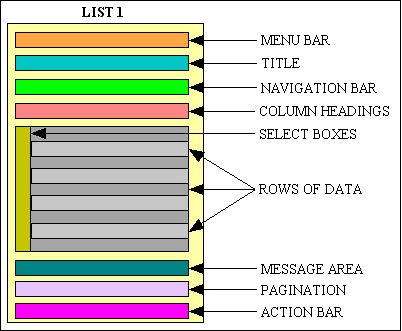
Upon initial entry this function will display details from the selected table starting at page 1. The number of rows in each page is held within each data object, but can be changed using options in the navigation bar.
It is also possible for selection criteria to be passed down from the previous function, in which case this will be used when retrieving data from the database.
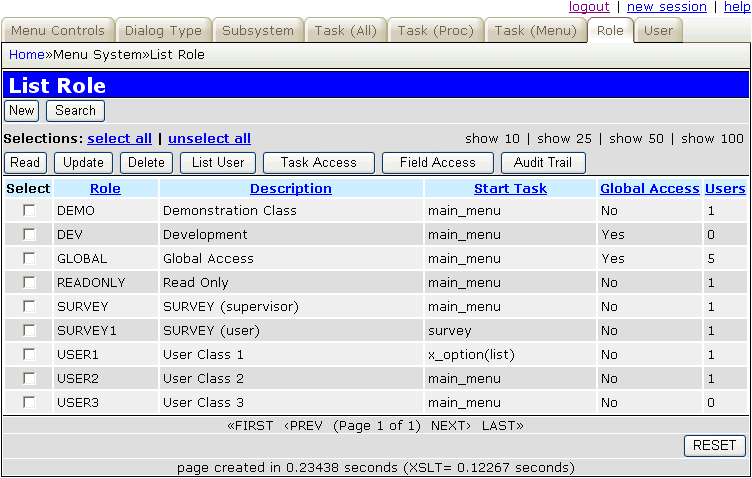
This screen contains the following areas:-
| Menu bar | This will show the menu options which led to this screen. |
| Title | This is supplied at runtime. |
| Navigation Bar | This may contain any buttons which are deemed appropriate for this function, among which may be:-
|
| Column Headings | These will be shown as hyperlinks so that the user can choose to have the data sorted by any column. |
| Data Area | As this area is for multiple occurrences the data from the selected table will be shown horizontally, one occurrence per line.
The select box on each line will be used to pass the primary key of that occurrence to the function associated with a button on the navigation bar. |
| Message Area | This will contain any messages or instructions. |
| Pagination | This area will allow the user to move forwards and backwards through the available 'pages' of data. |
| Action Bar | This area will contain the following button(s):-
|
List 1 screenshot
| initial entry | |
| re-entry | |
| build HTML |
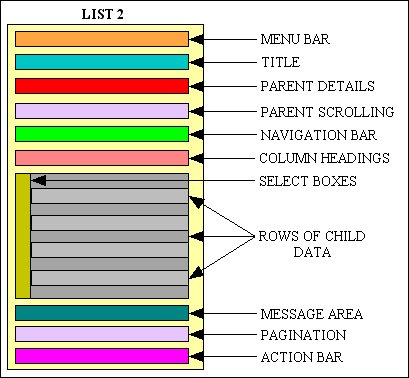
This function is used in a ONE-to-MANY relationship to display several occurrences of MANY for a selected occurrence of ONE.
Upon initial entry this function will retrieve the first of the selected occurrences from the ONE (parent) table, then retrieve associated rows from the MANY (child) table and display them starting at page 1. The number of rows in each page is held within each data object, as is any default sort criteria.
This screen contains the following areas:-
| Menu bar | This will show the menu options which led to this screen. |
| Title | This is supplied at runtime. |
| Parent Details | Details of the outer/parent entry which was selected in the previous function. All child entries are related to this parent. |
| Parent Scrolling | This will provide options to scroll forwards and backwards through the selected parent rows. |
| Navigation Bar | This may contain any buttons which are deemed appropriate for this function, among which may be:-
|
| Column Headings | These will be shown as hyperlinks so that the user can choose to have the data sorted by any column. |
| Data Area | As this area is for multiple occurrences the data from the child/inner table will be shown horizontally, one occurrence per line.
The select box on each line will be used to pass the primary key of that occurrence to the function associated with a button on the navigation bar. |
| Message Area | This will contain any messages or instructions. |
| Pagination | This area will allow the user to move forwards and backwards through the available 'pages' of data. |
| Action Bar | This area will contain the following button(s):-
|
List 2 screenshot
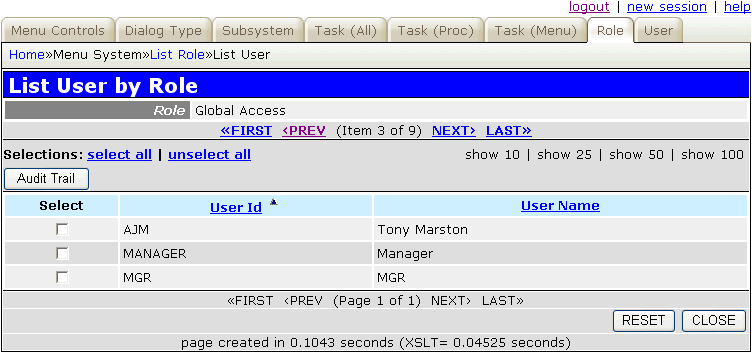
| initial entry |
|
| re-entry |
|
| build HTML |
|
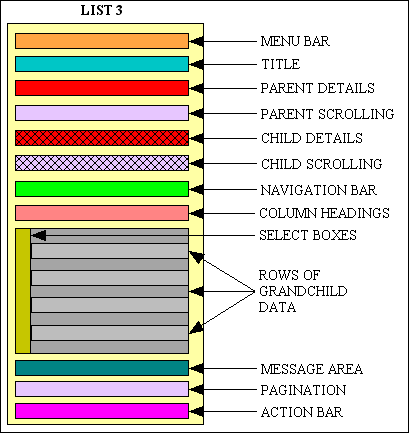
This function is used in a PARENT-to-CHILD-to-GRANDCHILD (or OUTER-to-MIDDLE-to-INNER) relationship where both PARENT-to-CHILD and CHILD-to-GRANDCHILD are defined as ONE-to-MANY relationships. For each occurrence of PARENT it will show related occurrences from the CHILD, and for each occurrence of CHILD it will show related occurrences from the GRANDCHILD.
Upon initial entry this function will retrieve the first of the selected occurrences from the PARENT/OUTER table using the selection criteria passed down by the previous form, then for the current PARENT it will retrieve the first of the associated occurrences from the CHILD/MIDDLE table. It will then retrieve associated occurrences from the GRANDCHILD/INNER table and display them starting from page 1.
Note that by default the grandchild/inner entity will not be processed unless the child/middle entity reads a row from the database as the grandchild/inner entity requires the primary key of that row to use as its $where criteria. In some cases the child/middle entity may be optional, in which case it may not retrieve any data from the database, and the grandchild/inner entity will not be processed. To avoid this situation the child/middle entity can set the $allow_zero_rows to TRUE. It should also include code in order to build a dummy entry in $fieldarray to contain fields for the primary key with the optional elements set to NULL, similar to the following:
function _cm_getExtraData ($where, $fieldarray)
{
    $pattern_id = getPatternId();
    if (preg_match('/LIST3/i', $pattern_id) AND $this->zone == 'middle') {
        if (empty($fieldarray)) {
            // insert values to be passed down to child (inner) table
            $parent_data = $this->getParentData();
            $fieldarray['product_id']  = $parent_data['product_id'];  // primary key of OUTER and MIDDLE entity
            $fieldarray['revision_id'] = null;                        // primary key of MIDDLE entity
        } // if
    } // if

    return $fieldarray;

} // _cm_getExtraData
This screen contains the following areas:-
| Menu bar | This will show the menu options which led to this screen. |
| Title | This is supplied at runtime. |
| Parent Details | Details of the parent entry which was selected in the previous function. All child entries are related to this parent. |
| Parent Scrolling | This will provide options to scroll forwards and backwards through the selected parent rows. |
| Child Details | This will show occurrences one at a time from the child table which are related to the current parent. All grandchild entries are related to this child. |
| Child Scrolling | This will provide options to scroll forwards and backwards through the child items which are related to the current parent. |
| Navigation Bar | This may contain any buttons which are deemed appropriate for this function, among which may be:-
|
| Column Headings | These will be shown as hyperlinks so that the user can choose to have the data sorted by any column. |
| Data Area | As this area is for multiple occurrences the data from the grandchild entity will be shown horizontally, one occurrence per line.
The select box on each line will be used to pass the primary key of that occurrence to the function associated with a button on the navigation bar. |
| Message Area | This will contain any messages or instructions. |
| Pagination | This area will allow the user to move forwards and backwards through the available 'pages' of data. |
| Action Bar | This area will contain the following button(s):-
|
List 3 screenshot
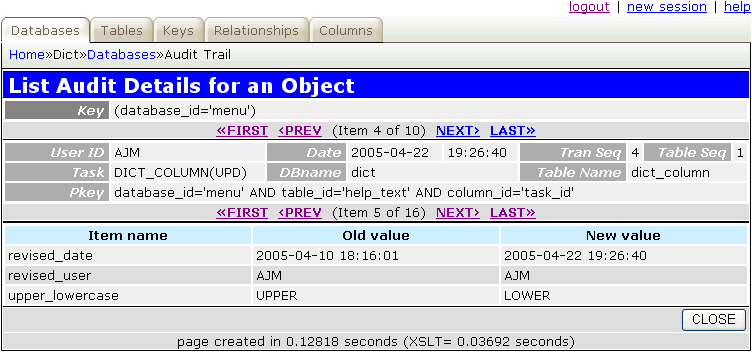
| initial entry |
|
| re-entry |
|
| build HTML |
|
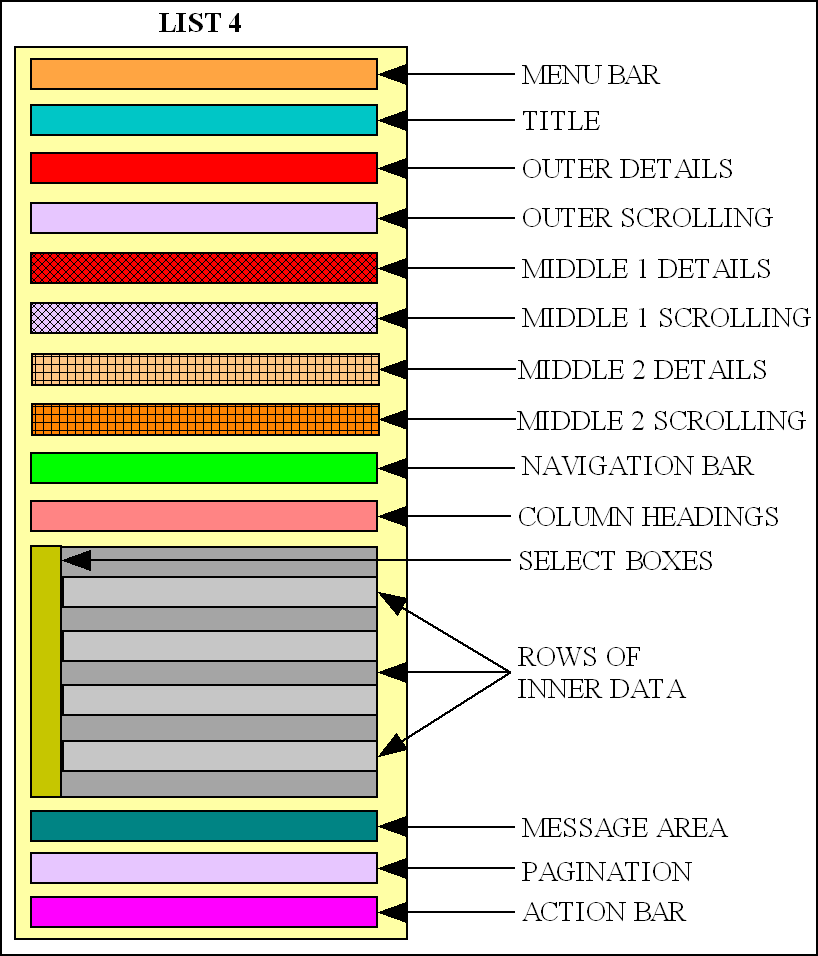
This function is used in an OUTER-to-MIDDLE1-to-MIDDLE2-to-INNER) relationship where both OUTER-to-MIDDLE1, MIDDLE1-to-MIDDLE2 and MIDDLE2-to-INNER are defined as ONE-to-MANY relationships. For each occurrence of OUTER it will show related occurrences from MIDDLE1, for each occurrence of MIDDLE1 it will show related occurrences from MIDDLE2, and for each occurrence of MIDDLE2 it will show related occurrences from INNER.
Upon initial entry this function will retrieve the first of the selected occurrences from the OUTER table using the selection criteria passed down by the previous form, then for the current OUTER it will retrieve the first of the associated occurrences from the MIDDLE table, then it will then retrieve associated occurrences from the MIDDLE2 table. It will then retrieve associated occurrences from the INNER table and display them starting from page 1.
This screen contains the following areas:-
| Menu bar | This will show the menu options which led to this screen. |
| Title | This is supplied at runtime. |
| Outer Details | Details of the outer entry which was selected in the previous function. All middle1 entries are related to this outer. |
| Outer Scrolling | This will provide options to scroll forwards and backwards through the selected outer items. |
| Middle1 Details | This will show occurrences from the middle1 table which are related to the current outer. All middle2 entries are related to this middle1. |
| Middle1 Scrolling | This will provide options to scroll forwards and backwards through the middle1 rows which are related to the current outer. |
| Middle2 Details | This will show occurrences from the middle2 table which are related to the current middle1. All inner entries are related to this middle2. |
| Middle2 Scrolling | This will provide options to scroll forwards and backwards through the middle2 items which are related to the current middle1. |
| Navigation Bar | This may contain any buttons which are deemed appropriate for this function, among which may be:-
|
| Column Headings | These will be shown as hyperlinks so that the user can choose to have the data sorted by any column. |
| Data Area | As this area is for multiple occurrences the data from the inner entity will be shown horizontally, one occurrence per line.
The select box on each line will be used to pass the primary key of that occurrence to the function associated with a button on the navigation bar. |
| Message Area | This will contain any messages or instructions. |
| Pagination | This area will allow the user to move forwards and backwards through the available 'pages' of data. |
| Action Bar | This area will contain the following button(s):-
|
List 4 screenshot
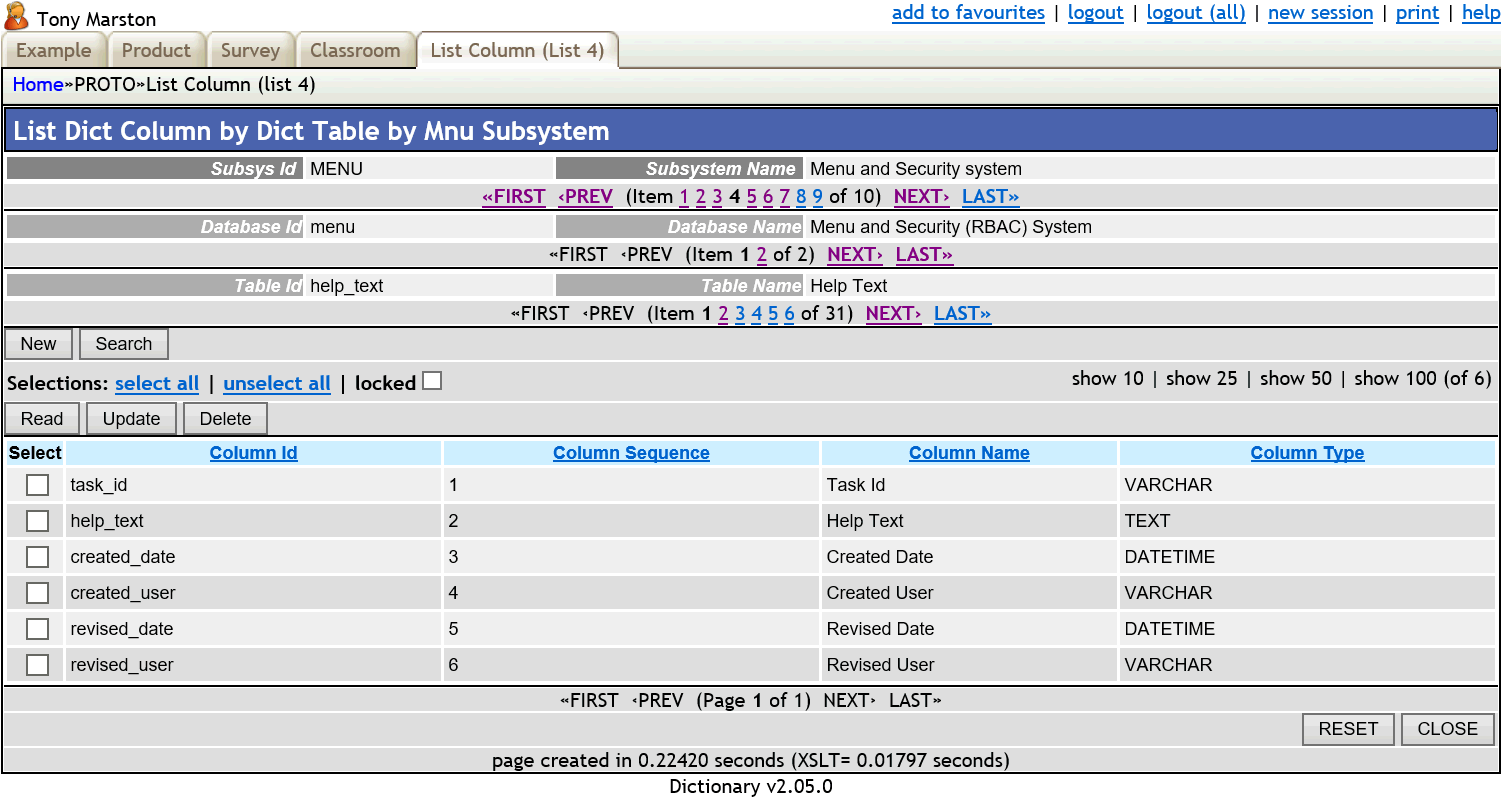
| initial entry |
|
| re-entry |
|
| build HTML |
|
These are called multi-purpose because they may allow more than one function within a single component.
This is used to maintain what is sometimes referred to as a MANY-to-MANY relationship but what is actually a ONE-to-MANY-to-ONE relationship, as described in How to handle a Many-to-Many relationship with PHP and MySQL. In this case the MANY table (also known as the INTERSECTION, XREF or LINK table) is used to indicate that a relationship exists between an occurrence of the first (outer) ONE table and an occurrence of the second (inner) ONE table.
A MANY-to-MANY relationship

This is achieved by having the primary key of the MANY (LINK) table constructed by combining the primary keys of the other two (OUTER and INNER) tables - thus the existence or non-existence of a record on the MANY (LINK) table indicates the existence or non-existence of a link between the other (OUTER and INNER) tables.
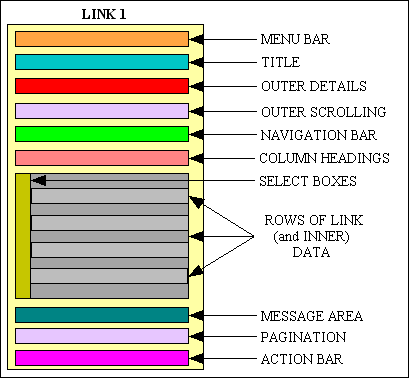
This function deals with two ONE-to-MANY relationships in the form of OUTER-to-LINK and INNER-to-LINK, which means that one of the ONE tables is designated as OUTER while the other is designated as INNER. It should not matter which is OUTER and which is INNER as they should be interchangeable. It should therefore be possible to create two versions of this transaction where each ONE table takes its turn at being OUTER as well as INNER.
Upon initial entry this function will retrieve an occurrence of the OUTER table using selection criteria passed down from the previous screen. If the selection criteria results in multiple occurrences then scrolling options will be made available.
It will then fill the LINK area by retrieving occurrences from both the LINK and INNER tables by means of an sql JOIN. There may be more occurrences of LINK than can fit onto a single page, so pagination options may be made available.
The INNER/LINK area will show all available occurrences from the INNER table, and if a corresponding entry exists on the LINK table then the SELECT box will be set to ON. If no corresponding entry exists on the LINK table then the SELECT box will be set to OFF. The user may toggle the value within any number of these SELECT boxes, then by pressing the SUBMIT button in the action bar the contents of the LINK table will be adjusted accordingly.
The initial display will show all available occurrences of OUTER which may contain a mixture of selected and non-selected occurrences of INNER. The SEARCH button in the navigation bar may be used to alter the display to show only those occurrence of INNER which have been selected, or alternatively only those occurrences which have not been selected.
Note that the navigation bar does not contain buttons for ADD or DELETE as records on the LINK table are added or deleted by toggling the SELECT box on each line.
In a simple situation the LINK table contains only a primary key, but it is possible for it to contain a number of non-key fields which may have their values displayed in the screen so that the user may change them. Both situations can be catered for by specifying the relevant sql SELECT values in the component script.
This screen contains the following areas:-
| Menu bar | This will show the menu options which led to this screen. |
| Title | This is supplied at runtime. |
| OUTER Details | Details of the OUTER entry which was selected in the previous function. |
| OUTER Scrolling | This will provide options to scroll forwards and backwards through the selected OUTER items. |
| Navigation Bar | This may contain any buttons which are deemed appropriate for this function, among which may be:-
|
| Column Headings | These will be shown as hyperlinks so that the user can choose to have the data sorted by any column. |
| Data Area | As this area is for multiple occurrences the data will be shown horizontally, one occurrence per line.
The select box on each line is used to indicate the existence of an occurrence of the LINK entity. By changing the setting for an occurrence and pressing the SUBMIT button on the action bar the associated occurrence of the LINK entity will be created or deleted as appropriate. |
| Message Area | This will contain any messages or instructions. |
| Pagination | This area will allow the user to move forwards and backwards through the available 'pages' of data. |
| Action Bar | This area will contain the following button(s):-
|
Link 1 screenshot
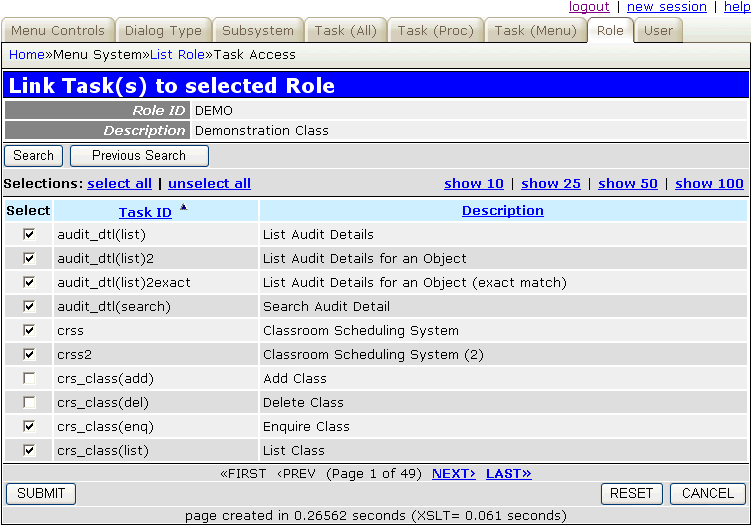
| initial entry |
|
| re-entry | |
| SUBMIT button |
|
| Javascript submit() |
|
| CUSTOM button |
|
| build HTML |
|
This has a screen similar to Update 1 but will allow one or more occurrences to be either inserted or updated depending on whether they currently exist or not. Due to the fact that rows may not currently exist the default scrolling mechanism cannot be used, therefore an array of occurrences has to be built using the setScrollArray() method which uses any selection criteria passed down to it by the parent screen. The getScrollItem() method is then used to navigate through this array. This allows custom code to be inserted such as the ability to jump over entries in the array depending on certain values being present.
When the SUBMIT button is pressed on each screen either the insertRecord() or updateRecord() method will be called, as appropriate.
In some cases the following additional buttons may appear in the action bar:
Multi 1 screenshot
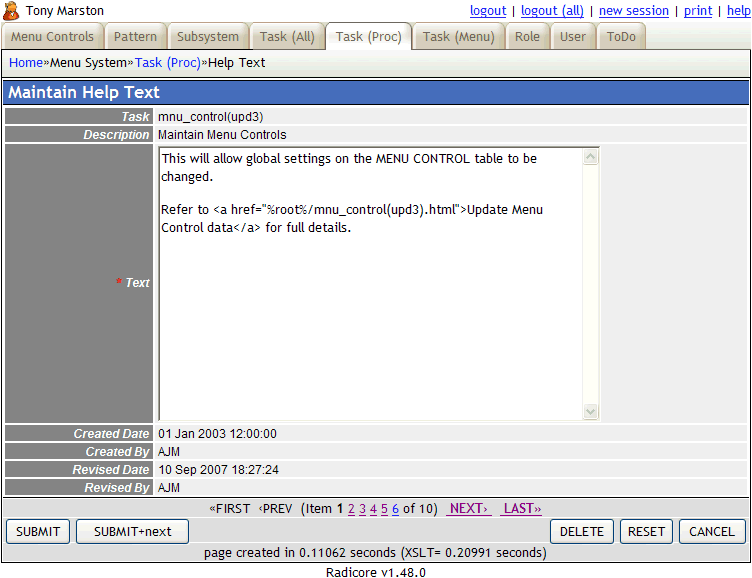
| GET method
(initial) |
|
| GET method
(subsequent) |
|
| SUBMIT button | |
| DELETE button | |
| RESET button | |
| POPUP button | |
| CUSTOM button | |
| JavaScript submit() NAVIGATION button |
|
| build HTML |
This will allow multiple MANY occurrences in a ONE-to-MANY (parent-child) relationship to be modified in a single operation.
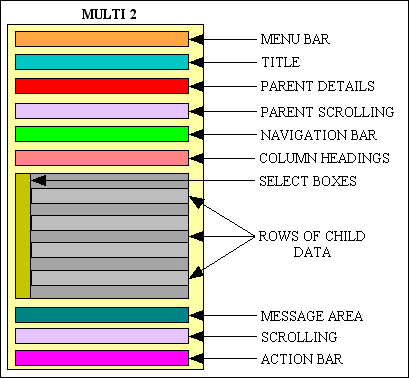
The identity of the ONE (parent) will be passed down from the previous screen. Occurrences of the MANY (child) will be retrieved and displayed starting at page 1. Standard pagination options will allow the user to step through all available pages. If more than one occurrence of the ONE table was selected then scrolling options will be made available.
Values may be changed in any number of rows, then sent to the database by pressing the SUBMIT button in the action bar.
By default the inner zone can only be used to modify existing rows, although navigation buttons can be used to run other tasks to add or remove rows one at a time. However, it is possible to use custom buttons to add or remove rows dynamically using the procedure documented in FAQ156. Note that these additions or deletions will not be actioned until a SUBMIT button is pressed.
Note that the updateMultiple() method call also perform inserts and deletes as well as updates.
This screen contains the following areas:-
| Menu bar | This will show the menu options which led to this screen. |
| Title | This is supplied at runtime. |
| Parent Details | Details of the parent entry which was selected in the previous function. All child entries are related to this parent. |
| Parent Scrolling | This will provide options to scroll forwards and backwards through the selected parent items. |
| Navigation Bar | This may contain any buttons which are deemed appropriate for this function, among which may be:-
|
| Column Headings | These will be shown as hyperlinks so that the user can choose to have the data sorted by any column. |
| Data Area | As this area is for multiple occurrences the data will be shown horizontally, one occurrence per line.
The select box on each line will be used to pass the primary key of that occurrence to the function associated with a button on the navigation bar. |
| Message Area | This will contain any messages or instructions. |
| Pagination | This area will allow the user to move forwards and backwards through the available 'pages' of data. |
| Action Bar | This area will contain the following button(s):-
|
Multi 2 screenshot
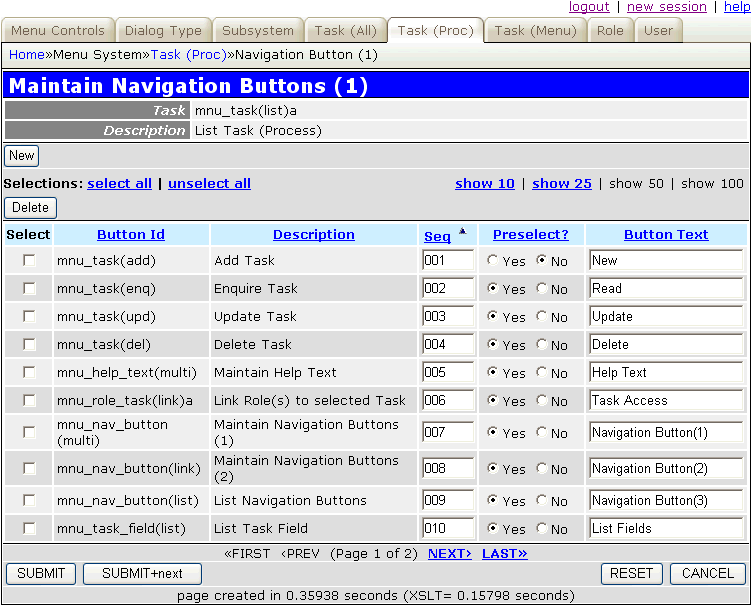
| initial entry |
|
| re-entry |
|
| SUBMIT button |
|
| RESET button | |
| POPUP button |
|
| CUSTOM button |
|
| JavaScript submit() NAVIGATION button |
|
| build HTML |
|
This is similar to MULTI 2 but instead of a PARENT-CHILD relationship it displays a GRANDPARENT-PARENT-CHILD relationship. This is expressed as OUTER-to-MIDDLE-to-INNER. Occurrences of OUTER and MIDDLE will be shown one at a time and will be read-only. The multiple occurrences of INNER may be modified.
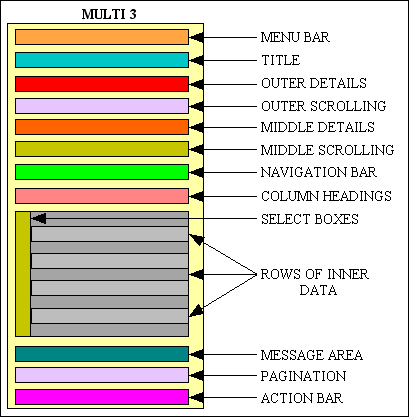
The identity of OUTER will be passed down from the previous screen. The first available occurrence of MIDDLE will be automatically retrieved, as will associated occurrences of INNER starting at page 1. Standard pagination options will allow the user to step through occurrences of INNER, and while a separate scrolling area will allow the user to step through occurrences of OUTER and MIDDLE.
Values may be changed in any number of rows, then sent to the database by pressing the SUBMIT button in the action bar.
By default the inner zone can only be used to modify existing rows, although navigation buttons can be used to run other tasks to add or remove rows one at a time. However, it is possible to use custom buttons to add or remove rows dynamically using the procedure documented in FAQ156. Note that these additions or deletions will not be actioned until a SUBMIT button is pressed.
Note that the updateMultiple() method call also perform inserts and deletes as well as updates.
This screen contains the following areas:-
| Menu bar | This will show the menu options which led to this screen. |
| Title | This is supplied at runtime. |
| OUTER Details | Details of the OUTER entry which was selected in the previous function. |
| OUTER Scrolling | This will provide options to scroll forwards and backwards through the selected OUTER items. |
| MIDDLE Details | Details of the MIDDLE entry which is available for this combination of OUTER and INNER. |
| MIDDLE Scrolling | This will provide options to scroll forwards and backwards through the available MIDDLE items. |
| Navigation Bar | This is not usually available for this type of function. |
| Column Headings | These will be shown as hyperlinks so that the user can choose to have the data sorted by any column. |
| Data Area | As this area is for multiple occurrences the INNER data will be shown horizontally, one occurrence per line. |
| Message Area | This will contain any messages or instructions. |
| Pagination | This area will allow the user to move forwards and backwards through the available 'pages' of data. |
| Action Bar | This area will contain the following button(s):-
|
Multi 3 screenshot
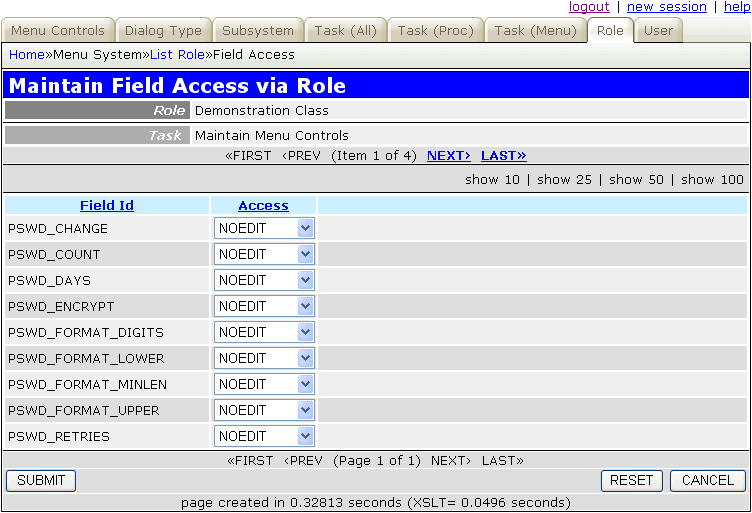
| initial entry |
|
| re-entry |
|
| SUBMIT button |
|
| RESET button | |
| POPUP button |
|
| CUSTOM button |
|
| JavaScript submit() NAVIGATION button |
|
| build HTML |
|
This is the same as MULTI 2, but will allow updates to both the parent and child tables.
If a field which is editable in the parent area also exists in the $fieldspec array of the child object, then that field will be included in the data which is sent to the child object.
The identity of the ONE (parent) will be passed down from the previous screen. Occurrences of the MANY (child) will be retrieved and displayed starting at page 1. Standard pagination options will allow the user to step through all available pages. If more than one occurrence of the ONE table was selected then scrolling options will be made available.
Values may be changed in any number of rows, then sent to the database by pressing the SUBMIT button in the action bar.
By default the inner zone can only be used to modify existing rows, although navigation buttons can be used to run other tasks to add or remove rows one at a time. However, it is possible to use custom buttons to add or remove rows dynamically using the procedure documented in FAQ156. Note that these additions or deletions will not be actioned until a SUBMIT button is pressed.
Note that the updateMultiple() method call also perform inserts and deletes as well as updates.
Note that by default the contents of the OUTER entity will be retrieved from the database using the getData() method. However, if the use_scrollarray property is set to TRUE within the _cm_initialise() method this will call the setScrollArray() method to provide that data instead.
Multi 4 screenshot
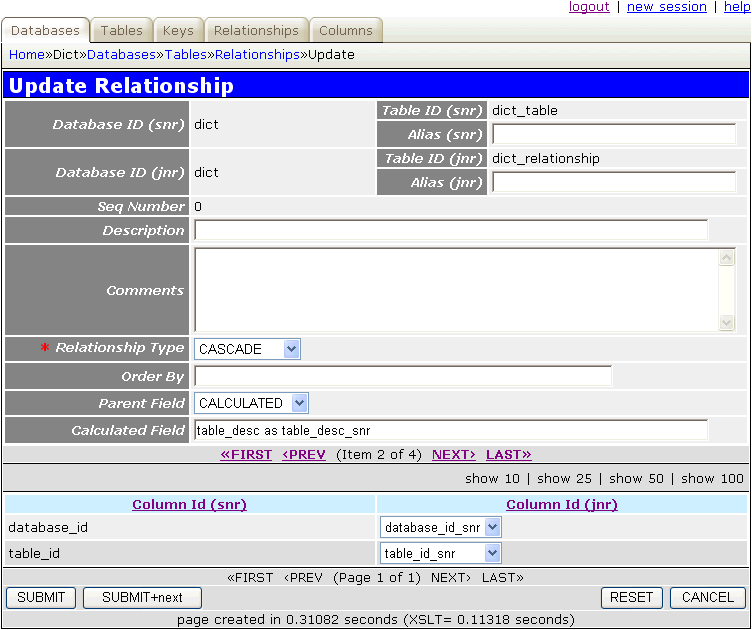
| GET method
(initial) |
|
| GET method
(subsequent) |
|
| SUBMIT button |
|
| RESET button | |
| POPUP button |
|
| CUSTOM button |
|
| JavaScript submit() NAVIGATION button |
|
| build HTML |
|
This is similar MULTI 2, but the outer/top/parent entity is used only to enter selection criteria while the inner/bottom/child entity is used to display and possibly amend those occurrences which satisfy that criteria.
The bottom zone can be made non-amendable (read-only) as shown in FAQ110.
Note that the updateMultiple() method call also perform inserts and deletes as well as updates.
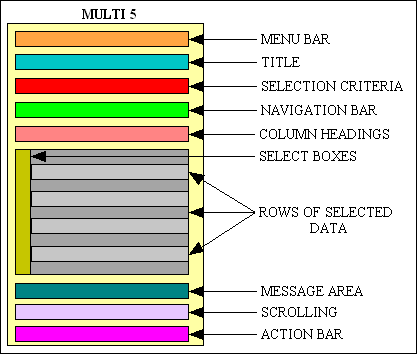
The OUTER entity may be programmed to load initial selection criteria which are passed to the INNER entity for automatic retrieval, after which the criteria can be changed and sent to the INNER entity by pressing the RETRIEVE button. Alternatively data for the INNER entity may not be retrieved until after the RETRIEVE button is pressed.
By default the inner zone can only be used to modify existing rows, although navigation buttons can be used to run other tasks to add or remove rows one at a time. However, it is possible to use custom buttons to add or remove rows dynamically using the procedure documented in FAQ156. Note that these additions or deletions will not be actioned until a SUBMIT button is pressed.
The screen contains the following areas:
| Menu bar | This will show the menu options which led to this screen. |
| Title | This is supplied at runtime. |
| Selection Criteria | Selection criteria. This entity will not perform an automatic retrieve. The fields in this area may be set to initial values upon entry and cause the bottom entity to perform an automatic retrieve. This area will also contain the following button:
Other buttons may be added by following the instructions in FAQ 137. |
| Navigation Bar | This may contain any buttons which are deemed appropriate for this function, among which may be:-
Note that these buttons will only perform operations on the inner/bottom/child entity. |
| Column Headings | These will be shown as hyperlinks so that the user can choose to have the data sorted by any column. |
| Data Area | As this area is for multiple occurrences the data will be shown horizontally, one occurrence per line.
The select box on each line will be used to pass the primary key of that occurrence to the function associated with a button on the navigation bar. |
| Message Area | This will contain any messages or instructions. |
| Pagination | This area will allow the user to move forwards and backwards through the available 'pages' of data. |
| Action Bar | This area will contain the following button(s):-
SUBMIT buttons will only be available if the lower area is amendable. |
Multi 5 screenshot
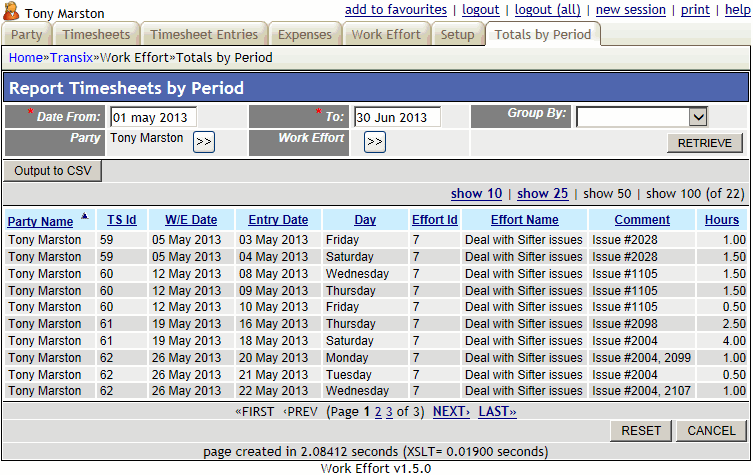
| GET method
(initial) |
|
| GET method
(subsequent) |
|
| SUBMIT button |
|
| RESET button | |
| POPUP button |
|
| CUSTOM button |
|
| JavaScript submit() NAVIGATION button |
|
| build HTML |
This is similar MULTI 5, but instead of having just two zones it has three in a parent/outer, middle/child and inner/grandchild relationship.
The bottom zone can be made non-amendable (read-only) as shown in FAQ110.
Note that the updateMultiple() method call also perform inserts and deletes as well as updates.
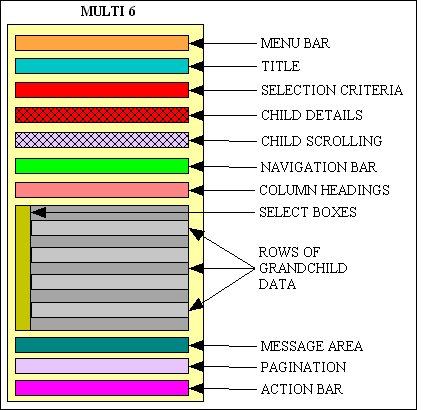
The OUTER entity may be programmed to load initial selection criteria which are passed to the MIDDLE entity for automatic retrieval, then the primary key of the current MIDDLE entity is passed to the INNER entity. After this the criteria can be changed and sent to the MIDDLE and INNER entities by pressing the RETRIEVE button. Alternatively data for the MIDDLE and INNER entities may not be retrieved until after the RETRIEVE button is pressed.
By default the inner zone can only be used to modify existing rows, although navigation buttons can be used to run other tasks to add or remove rows one at a time. However, it is possible to use custom buttons to add or remove rows dynamically using the procedure documented in FAQ156. Note that these additions or deletions will not be actioned until a SUBMIT button is pressed.
The screen contains the following areas:
| Menu bar | This will show the menu options which led to this screen. |
| Title | This is supplied at runtime. |
| Selection Criteria | Selection criteria. This entity will not perform an automatic retrieve. The fields in this area may be set to initial values upon entry and cause the child and grandchild entities to perform an automatic retrieve. This area will also contain the following button:
Other buttons may be added by following the instructions in FAQ 137. |
| Child Details | This will show occurrences from the child table which meet the selection criteria provided in the parent entity. All grandchild entries are related to this child. |
| Child Scrolling | This will provide options to scroll forwards and backwards through the child rows one at a time when there is more than one. See below for the option to display more than one row. |
| Navigation Bar | This may contain any buttons which are deemed appropriate for this function, among which may be:-
Note that these buttons will only perform operations on the grandchild entity. |
| Column Headings | These will be shown as hyperlinks so that the user can choose to have the data sorted by any column. |
| Grandchild Area | As this area is for multiple occurrences the data will be shown horizontally, one occurrence per line.
The select box on each line will be used to pass the primary key of that occurrence to the function associated with a button on the navigation bar. |
| Message Area | This will contain any messages or instructions. |
| Pagination | This area will allow the user to move forwards and backwards through the available 'pages' of data. |
| Action Bar | This area will contain the following button(s):-
SUBMIT buttons will only be available if the lower area is amendable. |
Multi 6 screenshot
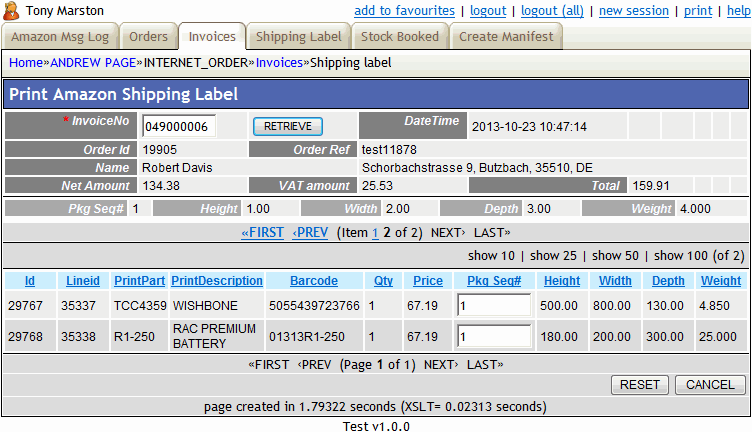
By default the middle entity (child) in this parent-child-grandchild relationship will only display one row at a time, with a scrolling area to move backwards and forwards through the selected rows. However, there is the option to display multiple rows at a time using instructions similar to the following:
    function _cm_initialise ($where, &$selection, $search)
    // perform any initialisation for the current task.
    // NOTE: $selection is passed by reference as it may be amended.
    // NOTE: $search    is only available for OUTPUT tasks.
    {
        $this->skip_getdata                  = true;    // perform all reads in _cm_customButton()
        $this->xsl_params['middle_multiple'] = 'y';     // allow this zone to show multiple rows
        $this->xsl_params['middle_nosort']   = 'y';     // disable all sort hyperlinks
        $this->setRowsPerPage(10);                      // show up to 10 rows at a time

        return $where;

    } // _cm_initialise
Note that with this option you will have to manage the selection criteria for the middle/child and lower/grandchild entities with care.
These functions will allow data to be output in formats other than HTML, such as CSV or PDF.
This function does not have any visible screen. It will extract data using the selection and sort criteria passed down from the previous screen, convert that data to CSV format (Comma Separated Values) and send it to the client browser where it can either be viewed immediately (usually in a spreadsheet program) or saved to disk.
The first row of the output file will contain the column labels, while all subsequent rows will contain data, one line per record.
| GET method |
Note that by default if no rows are retrieved from the database this program will not produce an output file but will return to the calling program with an error message. If the allow_zero_rows property is set then it will instead create an empty CSV file which contains a row of labels but no data.
This function will produce a PDF document which is suitable for printing. The completed PDF document can either be sent to the client or stored on the server. List View will output the data one record per line according to the specifications in the report structure file. More details on how this pattern can be used to produce customised reports may be found in RADICORE for PHP - creating PDF output.
This function is designed to be processed from a navigation button in a parent form. Whatever selection and sort criteria which is currently being used in the parent form will be passed down to this task so that whatever is being shown on the screen will appear in the report, but without the pagination option which restricts the output to a limited number of records. This selection and sort criteria may be overridden within the task, if desired.
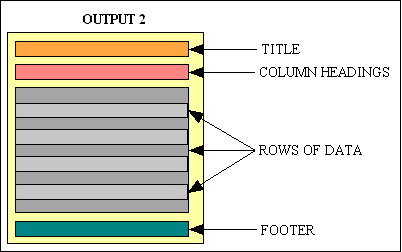
Each printed page will contain the following areas:-
| title | (optional) This is an optional title which will appear at the top of each page above the column headings, and may be spread over 1 or more lines. The contents of the title area are specified in the report structure file. |
| column headings | This will contain a heading above each column of data, as specified in the report structure file. |
| data | This will have one line of data for each record retrieved from the database. The identities of the fields to be displayed, and their sequence, is specified in the report structure file. There is also the option to append a line of accumulated totals at the end of the output. |
| footer | (optional) This will appear at the bottom of each page and will contain those elements which were specified in the report structure file. |
Output 2 report sample
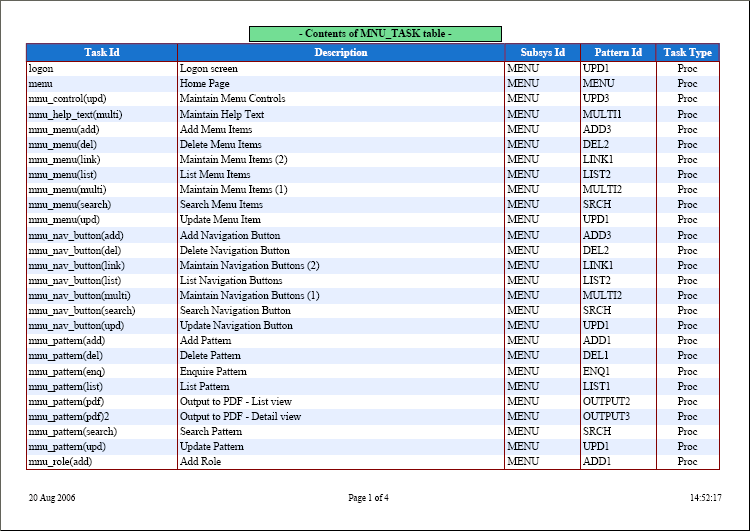
| GET method |
This function will produce a PDF document which is suitable for printing. The completed PDF document can either be sent to the client or stored on the server. List View will output the data one record per page according to the specifications in the report structure file. More details on how this pattern can be used to produce customised reports may be found in RADICORE for PHP - creating PDF output.
This function is designed to be processed from a navigation button in a parent form. Whatever selection and sort criteria which is currently being used in the parent form will be passed down to this task so that whatever is being shown on the screen will appear in the report, but without the pagination option which restricts the output to a limited number of records. This selection and sort criteria may be overridden within the task, if desired.
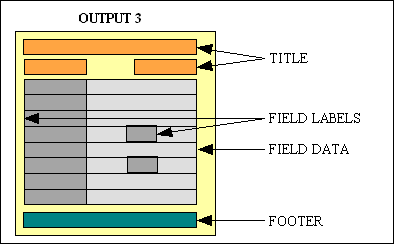
Each printed page will contain the following areas:-
| title | (optional) This is an optional title which will appear at the top of each page above the column headings, and may be spread over 1 or more lines. The contents of the title area are specified in the report structure file. |
| data | This will contain a combination of field labels and field data. Each line may contain either a single piece of data or multiple pieces of data. |
| footer | (optional) This will appear at the bottom of each page and will contain those elements which were specified in the report structure file. |
Output 3 report sample
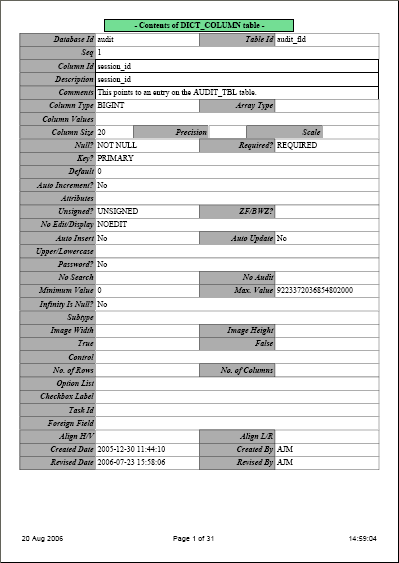
| GET method |
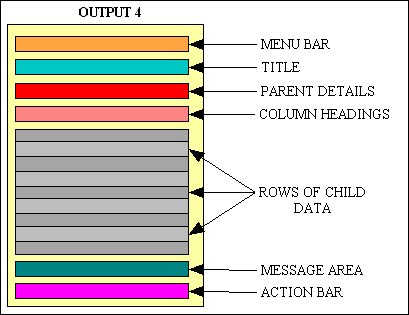
This function is similar to Output 1 but has a screen which allows the user to select which columns will be written to the output file. It will identify the columns which are available by selecting the first record and examining the result.
The first row of the output file will contain the column labels, while all subsequent rows will contain data, one line per record.
This screen contains the following areas:-
| Menu bar | This will show the menu options which led to this screen. |
| Title | This is supplied at runtime. |
| OUTER details | This will contain controls for the following:
|
| Data Area | This area will show rows of columns with the following labels:
|
| Message Area | This will contain any messages or instructions. |
| Action Bar | This area will contain the following buttons:-
|
NOTE #1: If there is too much data to be extracted in a single operation the use of LIMIT and OFFSET will allow that data to be extracted in manageable chunks, as in:
| LIMIT 1000, OFFSET 0 | will extract the 1st 1,000 rows |
| LIMIT 1000, OFFSET 1000 | will extract the 2nd 1,000 rows |
| LIMIT 1000, OFFSET 2000 | will extract the 3rd 1,000 rows |
NOTE #2: By default the initial value of sort_seq will be the order in which the fields were defined in the SELECT part of the SQL query. These defaults can be altered by inserting the relevant code into the _cm_getColumnNames() method. These values can also be altered before pressing the SUBMIT button to produce the output file.
Output 4 screenshot
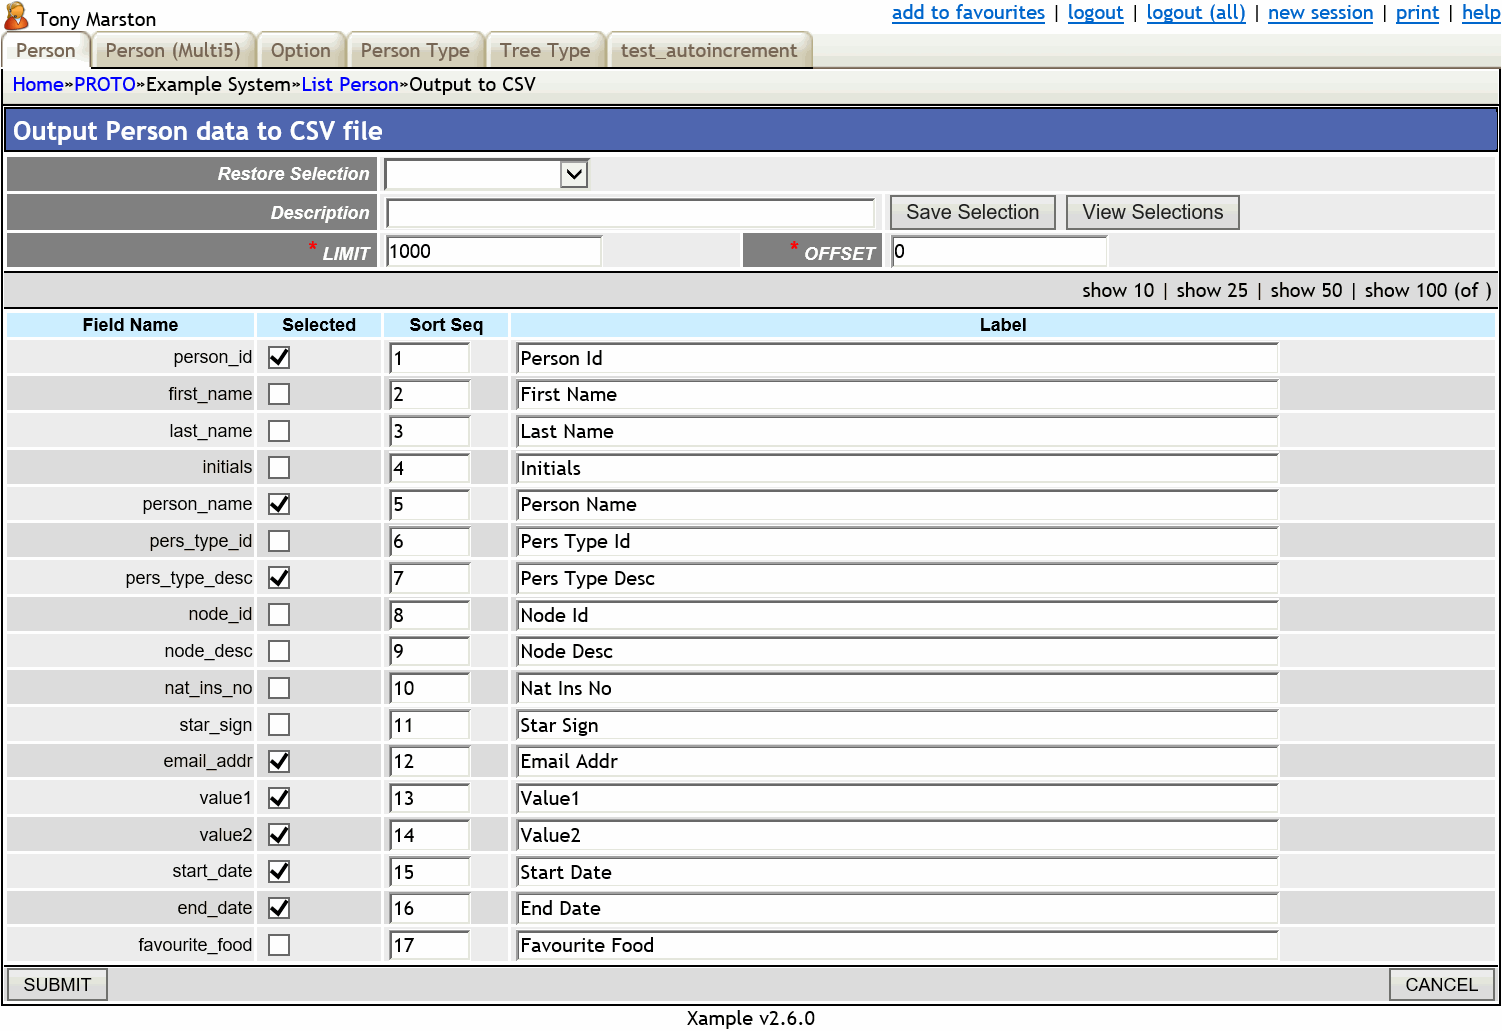
| GET method |
|
| POST method |
This function will produce a PDF document which is suitable for printing. The completed PDF document can either be sent to the client or stored on the server. Each page of the document will contain nothing but lines of address labels, so there will be no heading and no footer. More details on how this pattern can be used to produce customised reports may be found in RADICORE for PHP - creating PDF output.
This function is designed to be processed from a navigation button in a parent form. Whatever selection and sort criteria which is currently being used in the parent form will be passed down to this task so that whatever is being shown on the screen will appear in the report. This selection and sort criteria may be overridden within the task, if desired.
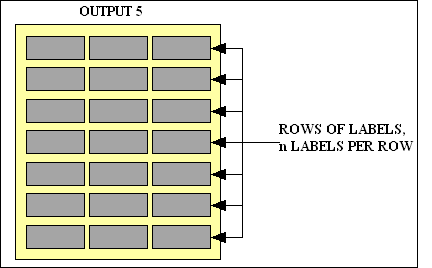
Each printed page will contain the following areas:-
| rows of labels | Each label will have the same dimensions and will contain lines of text. The report structure file and the PDF Style File file can be used to configure the following:
This will allow you to use any sort of commercial label stationery. |
Output 5 report sample
| GET method |
This function does not have any visible screen. It will extract data for the top nodes in a hierarchy using the selection passed down from the previous screen, extract any child nodes down to any level, convert that data to CSV format (Comma Separated Values) and send it to the client browser where it can either be viewed immediately (usually in a spreadsheet program) or saved to disk.
The first row of the output file will contain the column labels, while all subsequent rows will contain data, one line per record.
| GET method |
|
These screens are an alternative to dropdown lists and radio groups.
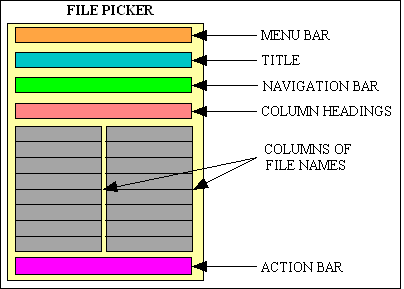
This type of function is normally invoked from a parent function which has a popup button ![]() next to (or instead of) the data entry field. When this button is pressed it will activate the popupCall() method before calling the nominated task. After the popup form has been processed the original task will be reactivated, and the popupReturn() method will be used to deal with whatever has been selected.
next to (or instead of) the data entry field. When this button is pressed it will activate the popupCall() method before calling the nominated task. After the popup form has been processed the original task will be reactivated, and the popupReturn() method will be used to deal with whatever has been selected.
It is used to display the files that exist in a pre-selected directory in a multi-column layout. Each filename will be shown as a hyperlink, so all the user has to do to make a selection is to click on a filename.
In cases where the files to be selected are images it may be possible to include a thumbnail image in the display.
The name of the directory from which the file will be picked and the valid file types are all specified in the _cm_initialiseFilePicker() method, as shown below:
    function _cm_initialiseFilePicker ($fieldarray)
    // perform any initialisation before displaying the File Picker screen.
    {
        // identify the subdirectory which contains the files
        $this->picker_subdir    = 'pictures';

        // identify the file types that may be picked
        $this->picker_filetypes = array();  // default is ANY file extension
        $this->picker_filetypes = array('bmp', 'jpg', 'png', 'gif');

        // specify the dimensions of the displayed image
        $this->image_height = 60;
        $this->image_width  = 60;

        // hyperlinks go direct to files, not redirected to download task
        $this->xsl_params['hyperlink_direct'] = 'y';

        // if a file is uploaded it will be returned immediately as if it was selected
        $this->return_uploaded_file = true;

        // identify the directory where cached results will be stored
        $this->cache_dir = 'files/cache';

        // list of subdirectories to be included
        // FALSE = none, TRUE = all, array() = list of allowed directories
        $this->picker_include_dir = FALSE;

        return $fieldarray;

    } // _cm_initialiseFilePicker
It is within the screen structure file that you define which fields are to be displayed. The following are available:
| file_name | The file name. |
| image or video |
An image of the file using the specified width and height, not the file's natural dimensions. The word 'image' is used for still images while 'video' is used for moving images. |
| file_size | The size of the file, in bytes. |
| file_date | The date on which the file was last modified. |
Note that as the details will be displayed in two column groups, not the usual one, the total width of each column group is 50%, as shown in the following example:
<?php
$structure['xsl_file'] = 'std.filepicker.list1.xsl';

$structure['tables']['main'] = 'file';

// identify the number of column and their widths
// (as columns are displayed in pairs each should be 50% of the total screen width)
//$structure['main']['columns'][] = array('width' => 1);
$structure['main']['columns'][] = array('width' => '40%');
$structure['main']['columns'][] = array('width' => '10%');
//$structure['main']['columns'][] = array('width' => '5%', 'align' => 'right');
//$structure['main']['columns'][] = array('width' => '17%');

// identify the field names and their screen labels
//$structure['main']['fields'][] = array('selectbox' => 'S');
$structure['main']['fields'][] = array('file_name' => 'File Name');
$structure['main']['fields'][] = array('image' => 'Image',
                                       'imagewidth' => 16,
                                       'imageheight' => 16);
//$structure['main']['fields'][] = array('file_size' => 'Size');
//$structure['main']['fields'][] = array('file_date' => 'Date');
?>
Please note that although the screen structure file contains the dimensions for the displayed images, it is also possible for these dimensions to be overridden by values specified in the _cm_initialiseFilePicker() method.
If you require a version to list video files instead of still images then you need to have a separate task with a separate screen structure file with the word 'image' changed to 'video', as in the following example:
$structure['main']['fields'][] = array('video' => 'Video',
                                       'imagewidth' => 180,
                                       'imageheight' => 320);
File Picker screenshot
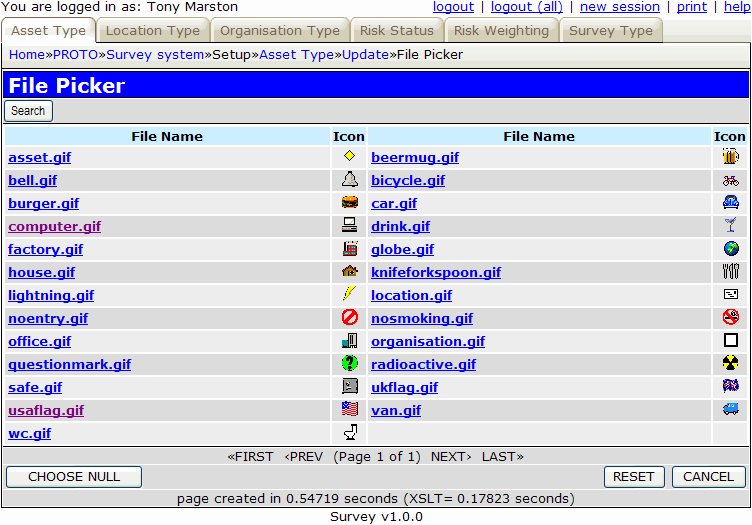
Please note the following:
return_uploaded_file option is set to FALSE.hyperlink_direct option is set the hyperlinks for each file will go direct to the browser instead of being passed back to the task for processing via the _cm_filePickerSelect() method.$picker_subdir contains sub-directories these will be displayed according to the value in $this->picker_include_dir which has the following options:
Any directory name that is displayed will appear as a file name without a size and a date. If selected the contents of that subdirectory will be displayed, and a button called "DIRECTORY UP" will appear in the action bar. Press this button to return to the parent directory.
$this->cache_dir then the value from ini_get('session.save_path') will be used instead. This cache is 'per session', so a new file will be created for each session. You can manually rebuild the current cache by pressing the RESET button.| GET method | |
| after selection |
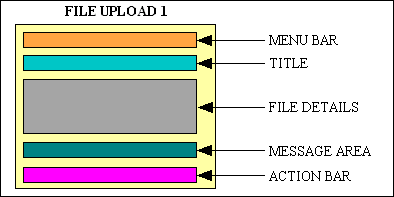
This type of function can either be invoked from a menu or navigation button, but can also be invoked from a parent function which has a popup button ![]() next to (or instead of) the data entry field. When this button is pressed it will activate the popupCall() method before calling the nominated task. After the popup form has been processed the original task will be reactivated, and the popupReturn() method will be used to deal with whatever has been selected.
next to (or instead of) the data entry field. When this button is pressed it will activate the popupCall() method before calling the nominated task. After the popup form has been processed the original task will be reactivated, and the popupReturn() method will be used to deal with whatever has been selected.
This will allow the user to upload a file from his device to the server. Note that a file can be rejected if it is the wrong type or above a maximum size.
The following variables need to be specified in the object's _cm_initialiseFileUpload() method:
    function _cm_initialiseFileUpload ($fieldarray)
    // perform any initialisation before displaying the File Upload screen.
    {
        $this->upload_subdir      = 'pictures';

either: $this->upload_filetypes   = array('image/x-png', 'image/gif');
or:     $this->upload_filetypes   = 'image';
or:     $this->upload_filetypes   = '*';

        $this->upload_maxfilesize = 100000;
        $this->upload_blacklist   = array("\.php.*", "\..*htm.*");
        $this->allow_multiple     = TRUE;

        return $fieldarray;

    } // _cm_initialiseFileUpload
If $this->allow_multiple is set to TRUE then this will enable the 'SUBMIT+stay' button so that after a file has been uploaded it will stay in the screen so that another file can be uploaded.
It is also possible to get the upload process to automatically create copies of an image file with different dimensions by populating the object's resize_array using code similar to the following:
        $this->resize_array[1]['directory'] = 'thumbs';
        $this->resize_array[1]['width']     = 60;
        $this->resize_array[1]['height']    = 60;

        $this->resize_array[2]['directory'] = 'large';
        $this->resize_array[2]['width']     = 400;
        $this->resize_array[2]['height']    = 400;
This indexed array can contain any number of entries.
The name of the uploaded file can be changed by code in the _cm_fileUpload() method.
After the file has been uploaded it can be processed by code in the _cm_post_fileUpload() method.
This function may be called in place of a filepicker, or from the navigation bar of a filepicker, or from a popup button.
After returning to a task from a fileupload where one or more files were uploaded, a list of uploaded files will be made available in the $return_files argument of the _cm_restart(), _cm_popupReturn() and _cm_post_popup_return() methods. This will be an array containing data in the following format:
    $files[0]['url'] = "\var\www\html\documents\example1.pdf"
    $files[0]['filename_orig'] = 'example.pdf'
    $files[0]['filename'] = 'example'
    $files[0]['extension'] = 'pdf'
    $files[0]['size'] = 23400
File Upload screenshot
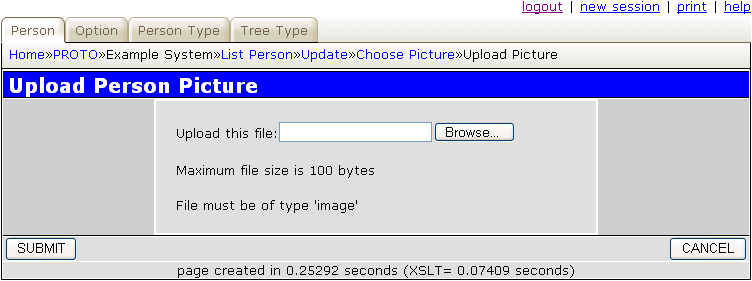
| GET method | |
| POST method |
This function does not have any visible screen. This will allow the user to download a file from the web server to his client device. The user selects an entity which contains the name of the file to be downloaded, then activates this transaction by pressing a button on the navigation bar. Alternatively this can be used to process files which are selected in a filepicker screen.
If the task is to be used to download files which have been selected in a filepicker screen then the _cm_initialise() method should contain code similar to the following:
function _cm_initialise ($where, $selection)
// perform any initialisation for the current task.
{
    // do not try to read any data as this table does not exist
    $this->skip_getdata = true;

    // identify the subdirectory which contains the files
    $this->picker_subdir = '../logs';

    return $where;

} // _cm_initialise
Unless the $this->skip_getdata option has been set the name of the file to be downloaded is extracted from the selected database record and placed in the $this->download_filename variable in the _cm_intialiseFileDownload() method as shown below:
    function _cm_initialiseFileDownload ($fieldarray)
    // perform any initialisation for the file download operation.
    {
        // 'picture' field contains name of file to be downloaded
        $this->download_filename = $fieldarray['picture'];
        //$this->download_mode     = 'inline';  // disable option to save

        return;

    } // _cm_initialiseFileDownload
If you place the value 'inline' into $this->download_mode it will display the file in the browser without providing the option to save it to disk.
The updateRecord() method is called in case it is necessary to increment a download count, such as in the following example:
    function _cm_pre_updateRecord ($rowdata)
    // perform custom processing before database record is updated.
    // errors are added to $this->errors.
    {
        // update download details
        $rowdata['report_download'] = getTimeStamp();
        $rowdata['download_count']  = $rowdata['download_count'] +1;

        return $rowdata;

    } // _cm_pre_updateRecord
NOTE: this pattern uses the mime_content_type function which requires the mime_magic.magicfile = "/path/to/magic.mime" directive in your php.ini file.
| GET method |
This type of function is normally invoked from a parent function which has a popup button ![]() next to (or instead of) the data entry field. When this button is pressed it will activate the popupCall() method before calling the nominated task. After the popup form has been processed the original task will be reactivated, and the popupReturn() method will be used to deal with whatever has been selected.
next to (or instead of) the data entry field. When this button is pressed it will activate the popupCall() method before calling the nominated task. After the popup form has been processed the original task will be reactivated, and the popupReturn() method will be used to deal with whatever has been selected.
It is used to provide a picklist from the contents of a database table which has too many rows to fit into a dropdown list. It is provided in the form of one of the standard LIST screens or a TREE VIEW screen but with the addition of the following buttons on the action bar:-
Note that when the CHOOSE button is pressed in a POPUP screen it will cause the chooseButton() function to be called.
There are currently 4 types of popup available:
Popup1 screenshot
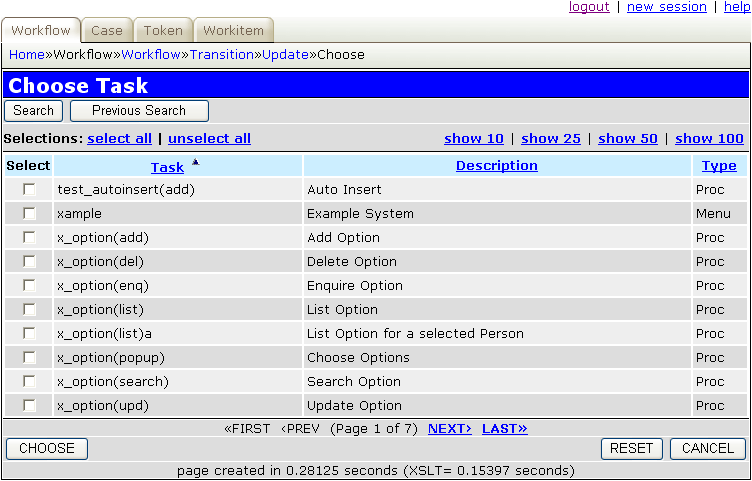
If the SELECT column contains checkboxes then it is possible to select more than one occurrence from the current screen. If only a single selection is possible then these checkboxes should be changed to radio buttons. This can be achieved by putting the string select_one=TRUE into the SETTINGS field for the popup task.
This type of popup has a parent/outer entity and a child/inner entity. Entries can only be selected from the child/inner entity, but these entries cannot be displayed until an occurrence of the parent/outer entity has been selected. The primary key of this occurrence can be suppled in one of the following ways:
These procedures are discussed in the FAQ.
Note that this situation also exists with POPUP 4 as it also deals with two entities.
This type of function is used to enter selection criteria before retrieving data from the database. It is usually called from a LIST function via a button on the navigation bar and will cause that function to perform a new retrieve using the modified selection criteria which is passed back to it. It is possible to force the LIST function to automatically jump to the search screen by using the initial_passthru option in the Update Task screen.
Note that if the LIST function was activated with initial selection criteria passed down as context from the previous screen then the search screen can only add to this criteria. It cannot modify or remove the initial selection criteria which will be shown as non-editable text.
Some tasks may use the QuickSearch Bar to provide a faster method of performing searches.
This function may also be used to enter selection criteria for a BATCH or OUTPUT task, in which case the _cm_post_search() method must be used to identify the new task so that it can be activated. It is not possible to pass the selection criteria back to the previous task if that task is of type BATCH or OUTPUT as this type of task cannot be suspended.
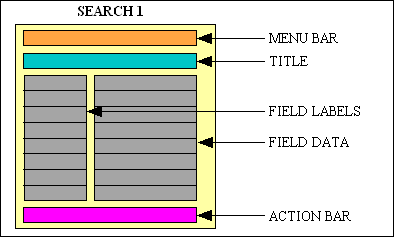
Upon initial entry this screen will usually be blank, but it may contain some values which were set in the parent form and which cannot be changed. If any previous values have been set using this screen then they will be shown as well (this will also cause the parent screen to have a PREVIOUS SEARCH button in the navigation bar). The user may enter whatever selection criteria is desired, then press the SUBMIT button to have it passed back to the calling transaction for processing.
By default the 'required' setting for each field will be turned off before the screen is displayed so that all fields are optional, but this can be re-instated in the _cm_changeConfig() method if necessary.
The following wild card characters are allowed anywhere in text fields:
| % (percent) | To represent zero or more characters. |
| _ (underscore) | To represent any single character. |
The following qualifying characters are allowed at the beginning of numeric fields:
| <= | less than or equal to |
| < | less than |
| >= | greater than or equal to |
| > | greater than |
| <> | not equal to |
| != | not equal to |
You may also use the terms 'is null' and 'is not null' in any field.
This screen contains the following areas:-
| Menu bar | This will show the menu options which led to this screen. |
| Title | This is supplied at runtime. |
| Data Area | As this area is for a single occurrence the data will be shown vertically, one field per line, with data on the right and labels on the left.
Boolean fields which are normally restricted to YES/NO or TRUE/FALSE will include a third option of UNDEFINED. |
| Action Bar | This area will contain the following buttons:-
|
Search 1 screenshot
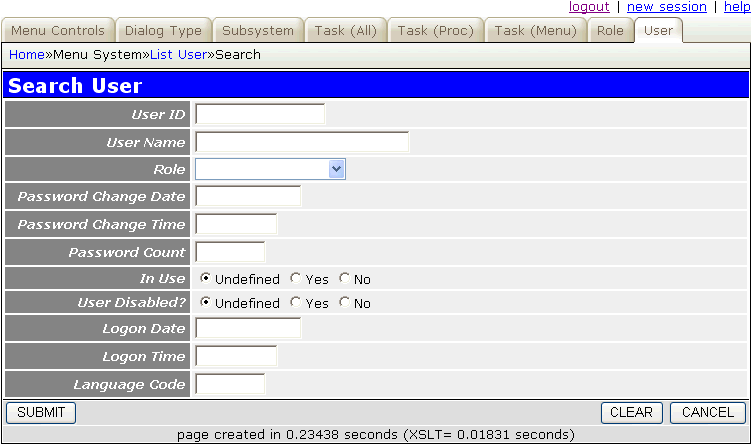
| GET method |
|
| POST method |
|
| CLEAR button | |
| build HTML |
This type of function is used for timetables or schedules.
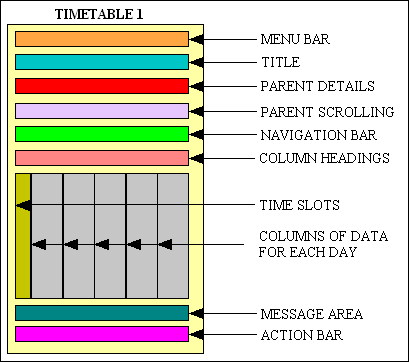
This function is used to display all the schedule/timetable (child) entries for a selected parent.
Upon initial entry this function will retrieve the first of the selected occurrences from the ONE (parent) table, then retrieve all the associated rows from the schedule/timetable (child) table and display them on a single page with a separate column for each day. Each scheduled event will appear as a separate box in the relevant column for that day, with the top of the box aligned with the start time (as shown in the column on the far left) and the bottom of the box aligned with the end time.
This screen contains the following areas:-
| Menu bar | This will show the menu options which led to this screen. |
| Title | This is supplied at runtime. |
| Parent Details | Details of the parent entry which was selected in the previous function. All child entries are related to this parent. |
| Parent Scrolling | This will provide options to scroll forwards and backwards through the selected parent items. |
| Navigation Bar | This may contain any buttons which are deemed appropriate for this function. |
| Column Headings | These will not be shown as hyperlinks as the column sorting option is turned off. |
| Time Slots | This is a vertical column of time slots in increments of 15 minutes. Each line represents an interval which begins at the stated time. The start and end times are not hard-coded in the XSL stylesheet but passed in as parameters by inserting code into the database object similar to the following:
$this->xsl_params['start_time'] = '09:00'; $this->xsl_params['end_time'] = '16:00'; |
| Day Columns | There will be one vertical column of data for each day covered by the schedule. The days are numbered 1-7 and represent Monday-Sunday. The last day in the display in not hard-coded in the XSL stylesheet but passed in as a parameter by inserting code into the database object similar to the following:
$this->xsl_params['last_day_no'] = 5; // 5=Friday; Each scheduled event will be represented as a box containing a description.
|
| Message Area | This will contain any messages or instructions. |
| Action Bar | This area will contain the following button(s):-
|
Timetable 1 screenshot
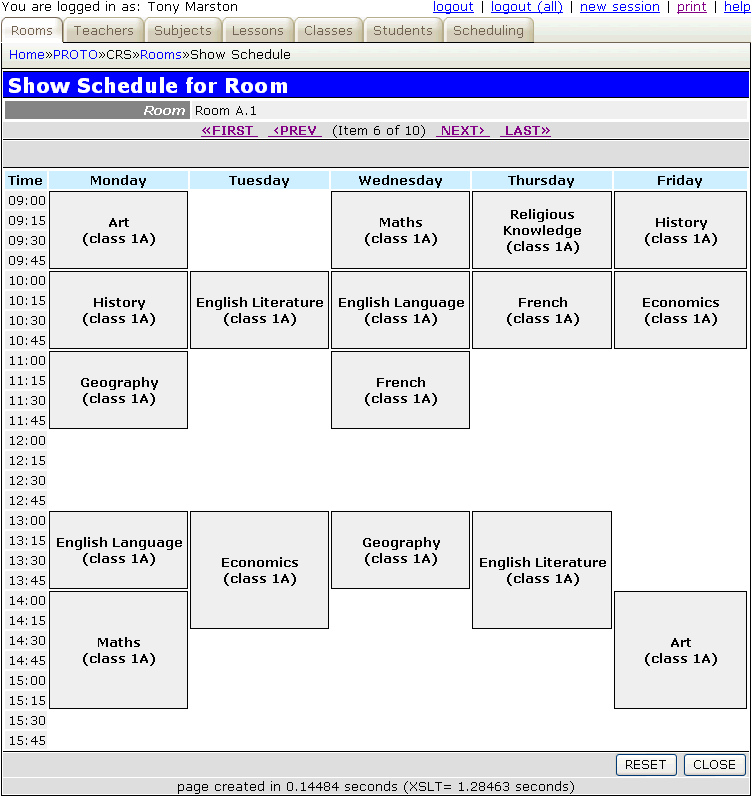
| initial entry | |
| re-entry | |
| build HTML |
These types of screens are used to display the nodes in a tree structure where one node can be the parent of other nodes. This is a hierarchical structure which can support any number of levels.
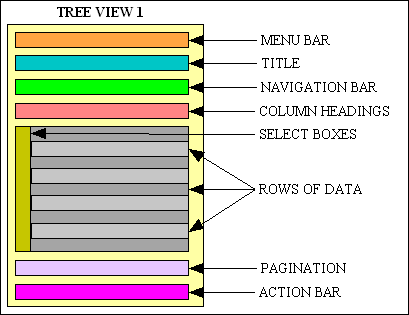
This screen accesses a simple hierarchical structure where a node can have zero or one parent but any number of children. A node without a parent is known as a root node, and upon initial entry to this screen only root nodes will be displayed. If a node has children then a button will be made available to either show or hide those children.
This screen contains the following areas:-
| Menu bar | This will show the menu options which led to this screen. |
| Title | This is supplied at runtime. |
| Navigation Bar | This may contain any buttons which are deemed appropriate for this function. |
| Column Headings | This is a label above each column of data. These will not be presented as hyperlinks as no sorting of the screen contents is allowed. |
| Data Area | As this area is for multiple occurrences the data will be shown horizontally, one occurrence per line.
The select box on each line will be used to pass the primary key of that occurrence to the function associated with a button on the navigation bar. Each row will represent a node within the selected tree structure. If a node has child nodes its description will be preceded by one of the following buttons:-
These buttons will toggle from one to the other each time they are pressed. |
| Pagination | This will only function on the first set of entries, not those which can be added by pressing the EXPAND button. |
| Action Bar | This area will contain the following buttons:-
|
Tree View 1 screenshot (without extra fields)
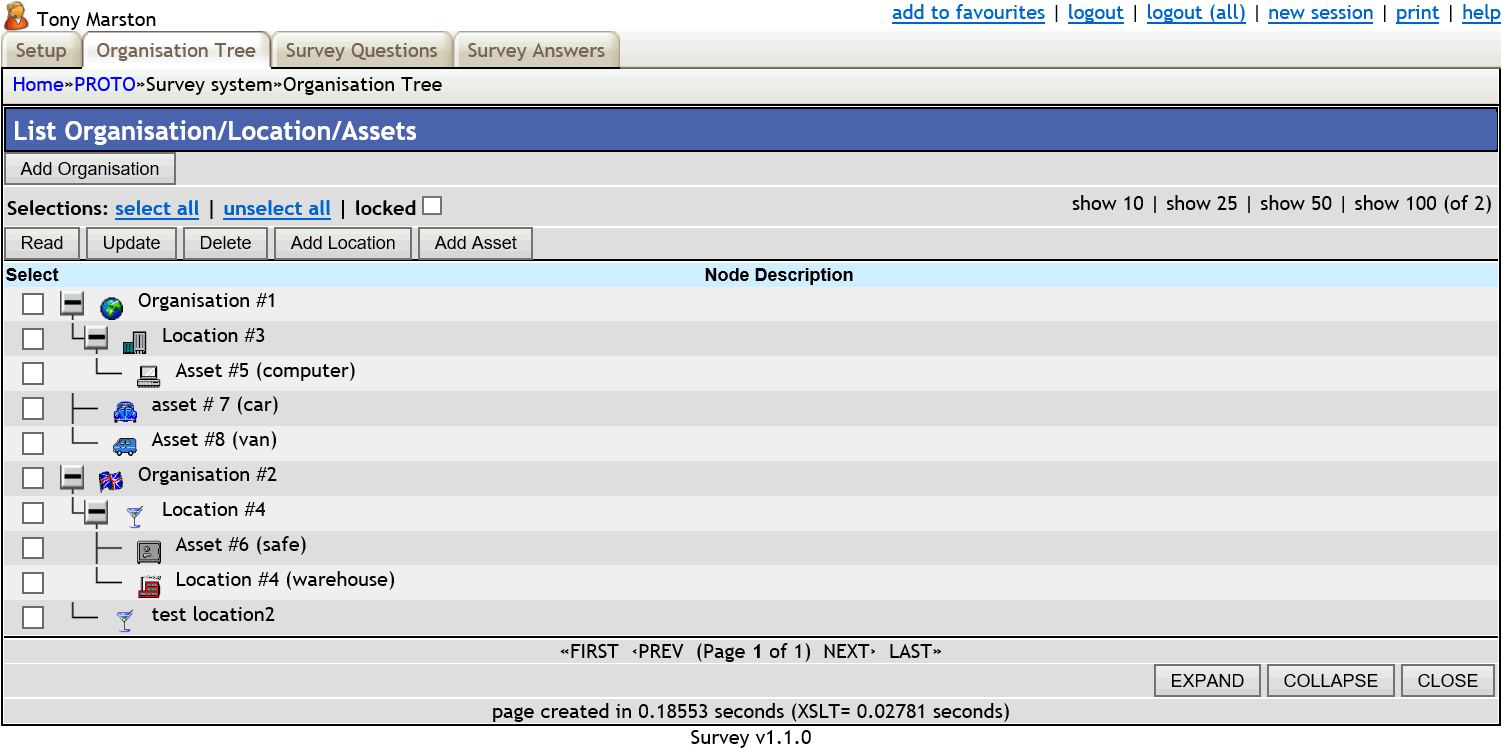
The screen structure file used for the above looks like the following:
$structure['xsl_file'] = 'std.tree.list1.xsl';

$structure['tables']['main'] = 'tree_node';

$structure['main']['columns'][] = array('width' => 5);
$structure['main']['columns'][] = array('width' => '*');

$structure['main']['fields'][] = array('selectbox' => 'Select');
$structure['main']['fields'][] = array('node_desc' => 'Node Description', 'nosort' => 'y');

$structure['main']['node_data_names'] = array('id' => 'node_id',
                                              'desc' => 'node_desc',
                                              'depth' => 'node_depth',
                                              'child_count' => 'child_count',
                                              'expanded' => 'expanded',
                                              'icon' => 'icon');
Note that the single node_desc field in the screen is constructed by concatenating all those fields identified in the node_data_names array. This allows you to map the screen names with the column names which are used in the database and which have been copied to the XML file.
Note also that it is possible to add extra columns to the screen following the node description, as shown in the following example:
Tree View 1a screenshot (with extra fields)
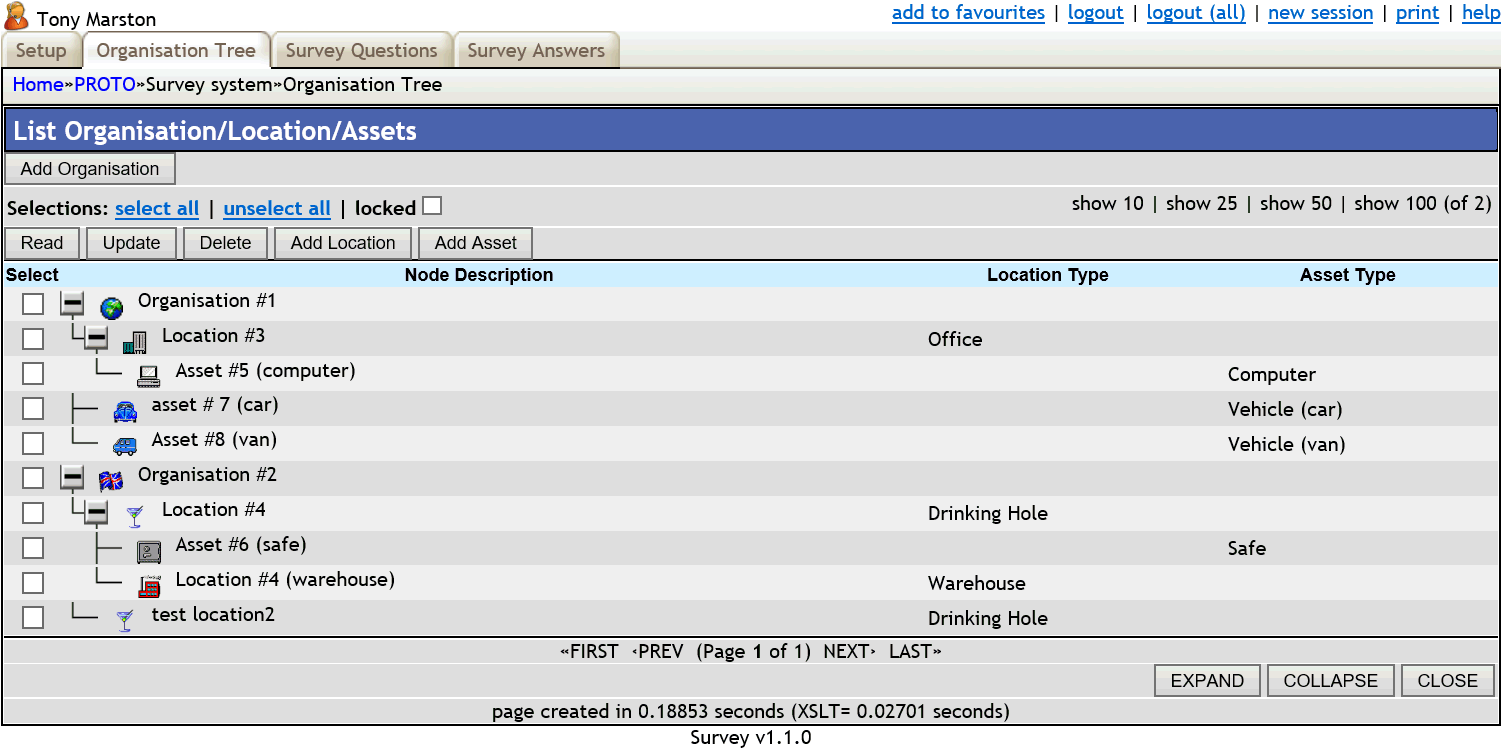
The screen structure file used for the above looks like the following:
$structure['xsl_file'] = 'std.tree.list1.xsl';

$structure['tables']['main'] = 'tree_node';

$structure['main']['columns'][] = array('width' => 5);
$structure['main']['columns'][] = array('width' => '*');
$structure['main']['columns'][] = array('width' => 200);  <== EXTRA
$structure['main']['columns'][] = array('width' => 200);  <== EXTRA

$structure['main']['fields'][] = array('selectbox' => 'Select');
$structure['main']['fields'][] = array('node_desc' => 'Node Description', 'nosort' => 'y');
$structure['main']['fields'][] = array('location_type_id' => 'Location Type');  <== EXTRA
$structure['main']['fields'][] = array('asset_type_id' => 'Asset Type');        <== EXTRA

$structure['main']['node_data_names'] = array('id' => 'node_id',
                                              'desc' => 'node_desc',
                                              'depth' => 'node_depth',
                                              'child_count' => 'child_count',
                                              'expanded' => 'expanded',
                                              'icon' => 'icon');

// identify names of additional fields                              <== EXTRA
$structure['main']['node_extra_names'] = array('location_type_id',  <== EXTRA
                                               'asset_type_id');    <== EXTRA
Note that each additional column that you want to appear in the screen requires additional entries such as those marked with <== EXTRA.
| GET method |
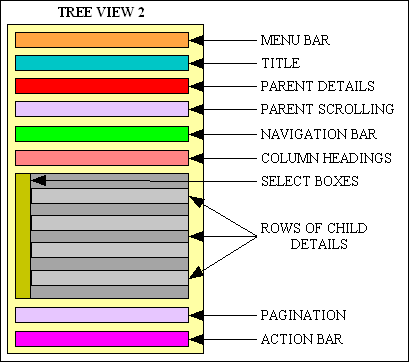
This is similar to TREE 1 but has an outer and an inner entity. The identity of the top/outer/parent entity will be passed down from the previous screen, and the bottom/inner/child entity will show that hierarchy of details, starting with all root nodes, which belong to the top/outer/parent entity.
It shares the same screen areas as the Tree View 1 screen.
Tree View 2 screenshot
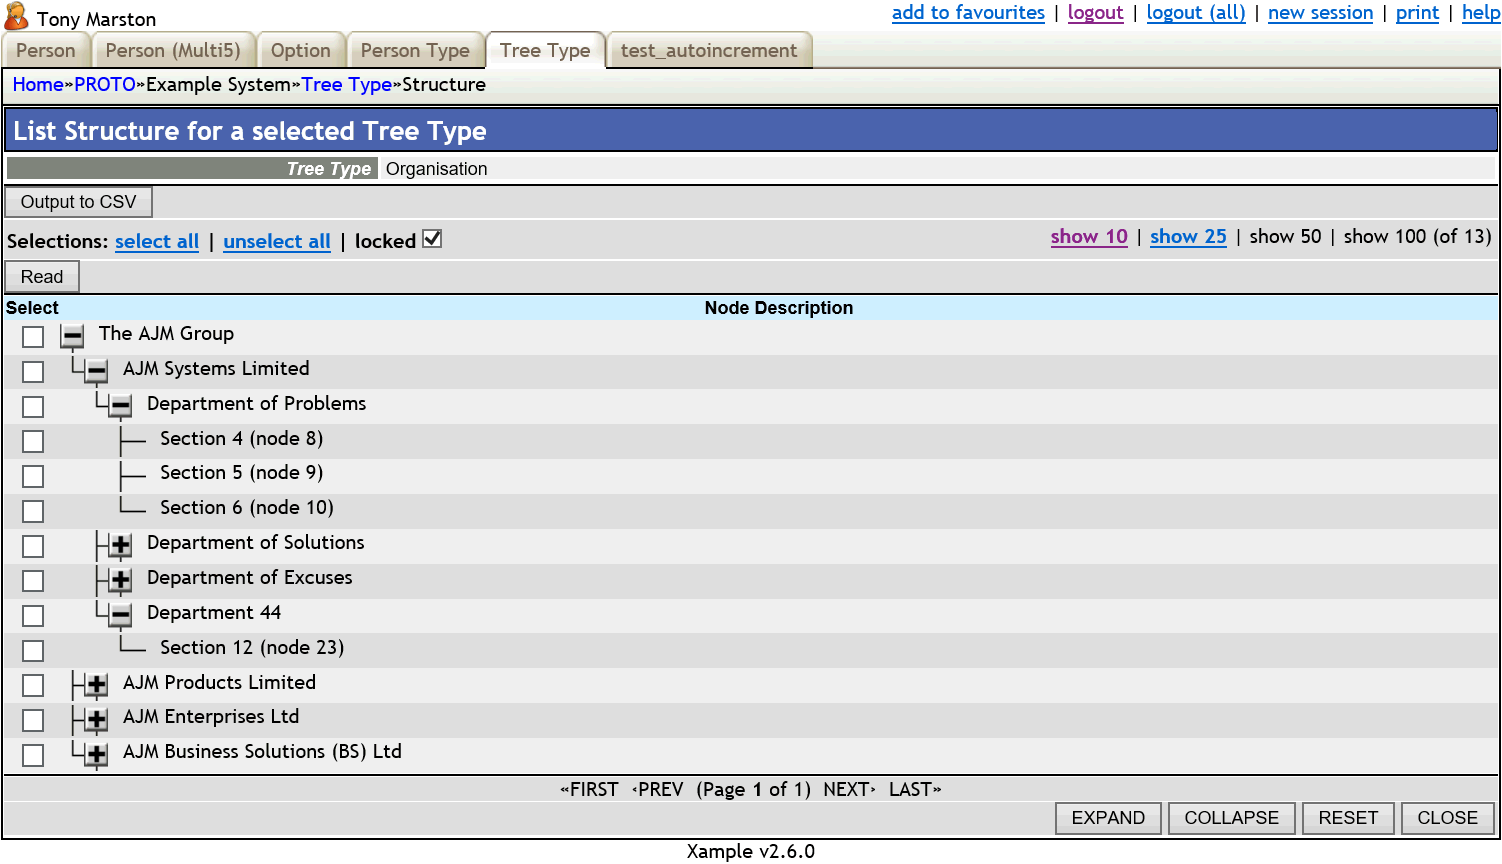
| GET method |
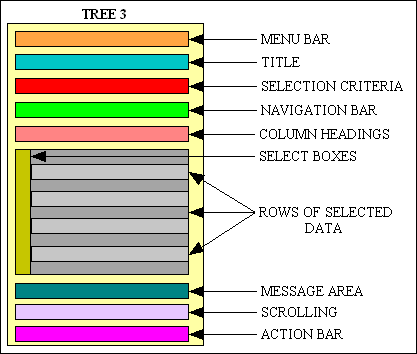
This is similar to a TREE 2, but the outer/top/parent entity is used only to enter selection criteria while the inner/bottom/child entity is used to display those occurrences which satisfy that criteria.
The OUTER entity may be programmed to load initial selection criteria which are passed to the INNER entity for automatic retrieval, after which the criteria can be changed and sent to the INNER entity by pressing the RETRIEVE button. Alternatively data for the INNER entity may not be retrieved until after the RETRIEVE button is pressed.
It shares the same screen areas as the Tree View 1 screen.
Tree View 3 screenshot
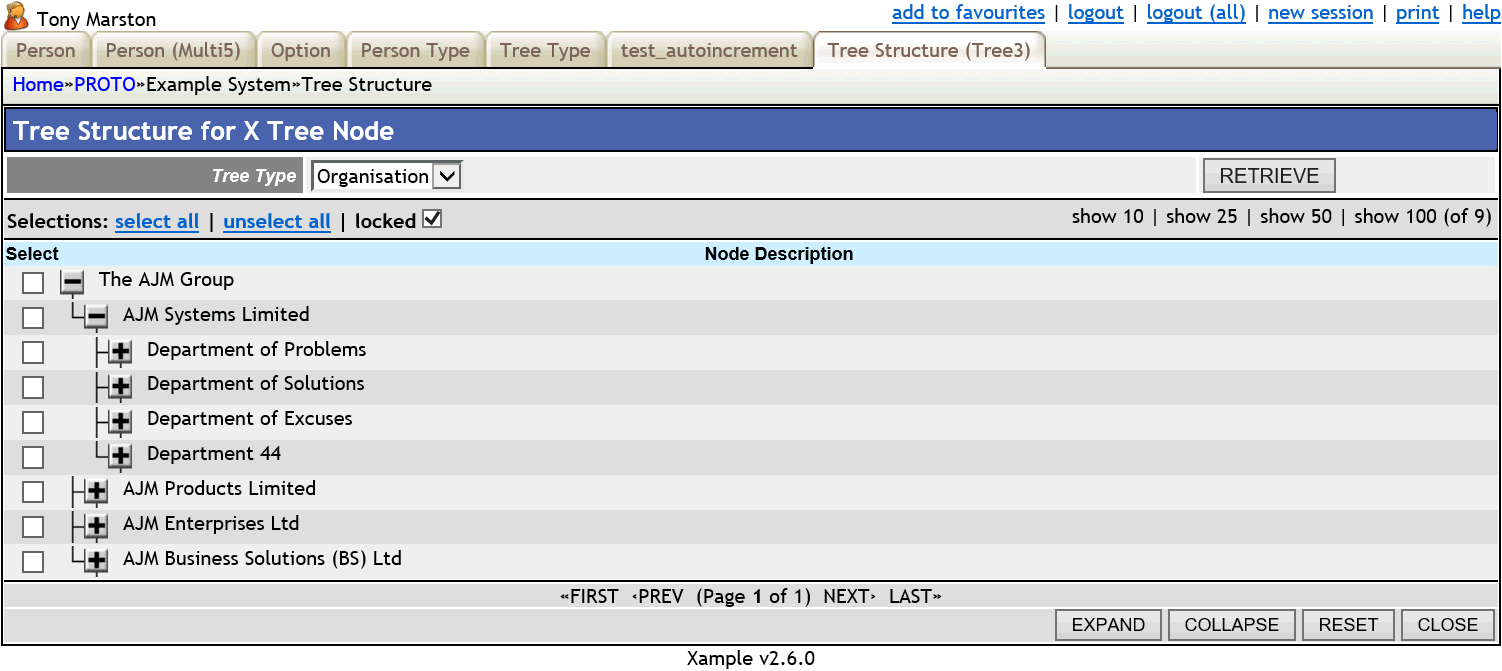
| GET method |
This type of function is used to update existing occurrences on the database.
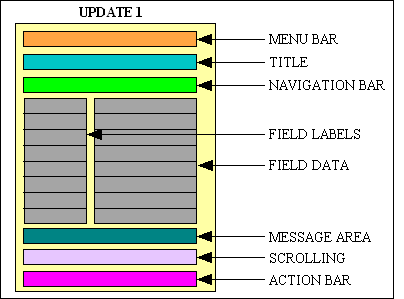
Upon initial entry this function will retrieve one or more records from the database using the primary key(s) passed down by the previous form. It will display the current values for one record at a time and allow the user to change them.
This screen contains the following areas:-
| Menu bar | This will show the menu options which led to this screen. |
| Title | This is supplied at runtime. |
| Navigation Bar | This is usually empty for this type of function, but may contain buttons which will allow the user to select other functions which show more details related to the current occurrence. |
| Data Area | As this area is for a single occurrence the data will be shown vertically, one field per line, with data on the right and labels on the left. |
| Message Area | This will contain any messages or instructions. |
| Scrolling Area | This will provide options to scroll forwards and backwards through the selected items. |
| Action Bar | This area will contain the following buttons:-
|
Update 1 screenshot
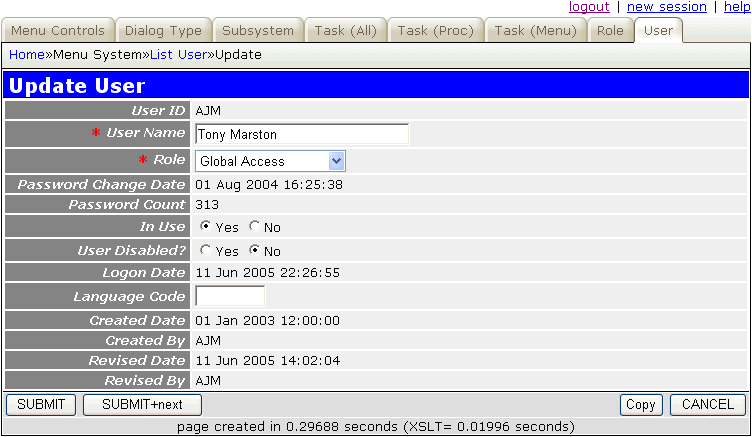
If it is necessary to prevent everyone except the record's creator from amending the record this can be achieved by putting the string created_user=$logon_user_id into the SETTINGS field for the task.
| GET method (initial) |
|
| GET method (subsequent) |
|
| POST method | |
| POPUP button | |
| CUSTOM button | |
| JavaScript submit() NAVIGATION button |
|
| CANCEL button | |
| build HTML | |
| Click here for a UML diagram | |
This function does not have any visible screen. It passes control to a POPUP screen where the user can select one or more occurrences, then uses the _cm_updateSelection() method to perform some sort of update. This may typically be to update each of the selected entries with the identity of the parent record. This is the reverse of a DELETE 3 function.
| Initial entry | |
| Re-entry | |
| build HTML |
This function has a screen similar to Update 1 but instead of having each field coming from the same database row, each field is actually from a different row in the same table. This is a design I have used successfully for many years to deal with what is sometimes referred to as 'control' data. Instead of having a single row with many values I have many rows each containing a single value. This allows me to add or delete values from the 'control' data without having to make any changes to the database structure. For more details please refer to A flexible method of storing control data.
The structure of my 'control' table is as follows:
CREATE TABLE `mnu_control` (
  `record_id` varchar(16) NOT NULL default '',
  `field_id` varchar(32) NOT NULL default '',
  `field_value` varchar(255) default NULL,
  PRIMARY KEY  (`record_id`,`field_id`)
) TYPE=MyISAM;
The class for my 'control' table then defines which values are to be retrieved from the database and how they are to be displayed on the screen. When the SUBMIT button is pressed these are updated using the _cm_updateSelection() method. Note that this method has been modified so that it will handle inserts as well as updates.
Update 3 screenshot
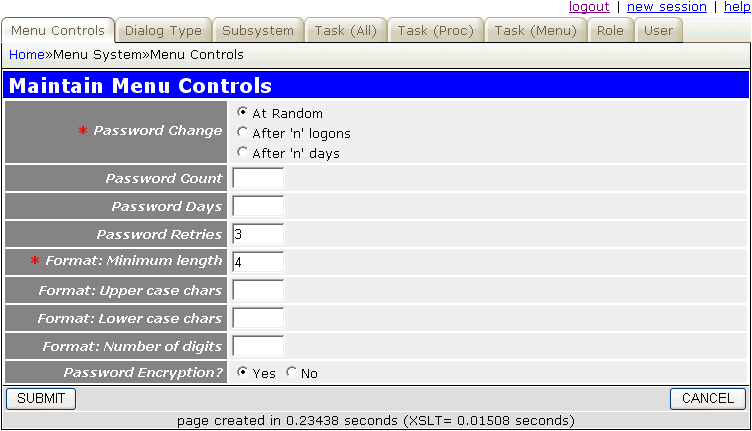
| GET method (initial) |
|
| GET method (subsequent) |
|
| POST method | |
| POPUP button | |
| JavaScript submit() NAVIGATION button |
|
| build HTML |
This function does not have any visible screen. It will allow one or more database rows to be updated without being displayed. Any selection criteria is passed down from the previous screen. Rows are then retrieved from the database using the getData() method, modified by code within the table class, then written to the database using the updateMultiple() method.
Alternatively the application code may decide not to update the database (by not putting anything in the output array) but to write results out to a non-database file, as in mnu_subsystem(upd4)export.
Note that the updateMultiple() method can also perform inserts and deletes as well as updates.
| GET method |
This function does not have any visible screen. It will allow one or more database rows to be inserted or updated without any dialog with the user. These rows must be constructed within the initialise() method so that they can be processed using the insertOrUpdate() method. This will examine each record in turn, and call either insertRecord() or updateRecord() depending on whether the primary key currently exists in the database or not.
| GET method |
Although there are advantages from being able to pick from a large variety of templates, the biggest problem is deciding which template, or combination of templates, to use in a particular set of circumstances. Just because a template is designed around a particular database structure does not mean that wherever you see that database structure you must use that template. There may be more than one option, so you have to be aware of the different options before you make a decision.
Take an example where the database has three tables arranged in a parent-child-grandchild relationship, as shown in Figure 3:
Figure 3 - Parent-Child-Grandchild relationship
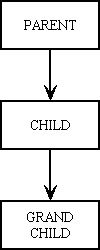
Amongst the patterns there is a LIST 1 which deals with a single table, a LIST 2 which deals with two tables in a parent-child relationship, and a LIST 3 which deals with three tables in a parent-child-grandchild relationship. You may think that this automatically indicates that you should use LIST 1 for the parent, LIST 2 for the child and LIST 3 for the grandchild, as shown in Figure 4:
Figure 4 - Possible use of List 1, List 2 and List 3
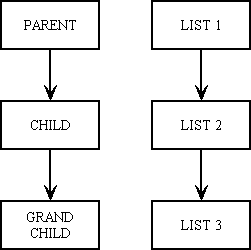
Although this combination would work, it may not be the best solution.
In the XAMPLE database as used by the Example application (available on the Prototype menu) there are three tables, 'person_type', 'person' and 'person_address' arranged in a parent-child-grandchild relationship. To maintain the 'person_type' table there is a LIST 1 accompanied by ADD 1, ENQUIRE 1 , UPDATE 1, DELETE 1 and SEARCH 1, but to maintain the 'person' table there is a LIST 1 where you might expect a LIST 2. Why is this? The reason is because of the restrictions that a LIST 2 imposes:
The use of a LIST 1 as the primary method to access the 'person' table provides the following advantages:
Having said that a LIST 1 screen should be the primary method of accessing the 'person' table, there is no reason why you cannot have a LIST 2 screen as an option the navigation bar of the 'person_type' screen as a secondary method of access.
The use of a LIST 2 screen to access the 'person_address' table is justified for the following reasons:
This produces an actual structure shown in Figure 5:
Figure 5 - Actual structure of templates used
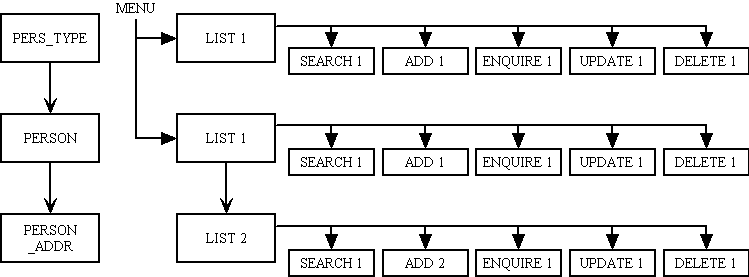
The use of a LIST 3 screen to access the 'person_address' table is not justified as it would mean starting with the LIST 1 screen in order to choose a 'person_type' before being able to navigate down to the LIST 2 screen to choose a 'person'. This extra step would insist that you know the value of 'person_type' before being able to view 'person', and as this restriction does not exist in real life it should not be enforced by the software.
Having said that a LIST 2 screen should be the primary method of accessing the 'person_address' table, there is no reason why you cannot have a LIST 1 screen as an option on a menu bar as a secondary method of access so that you can perform searches and inquiries without being restricted to a particular person.
All of these will add records to the database, but with subtle variations.
All of these will update records in the database, but with subtle variations.
_cm_updateSelection method which will perform the update. This will typically be to update each selected record with the identity of the parent. This is the reverse of a DELETE 3 function.updateMultiple method. Alternatively the application code may decide to leave the array empty (thus not updating the database) and instead write results out to a non-database file, as in mnu_subsystem(upd4)export.All of these will remove records from the database, but with subtle variations.
_cm_deleteSelection() method. It may actually delete the selected records, or it may update them by nullifying a foreign key.Take the example where there are three database tables which are related in a ONE-to-MANY-to-ONE relationship, in other words a 'child' with two 'parents', as shown in Figure 6:
Figure 6 - A ONE-to-MANY-to-ONE relationship
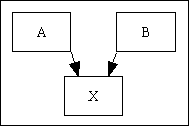
For the maintenance screens it is necessary to start with one of the parents and list its children, and perhaps showing some data retrieved from the other parent table. In this situation there are various combinations of templates which are available, and, depending on the particular circumstances, one may be more beneficial than the others.
Figure 7 - A ONE-to-MANY-to-FOREIGN relationship
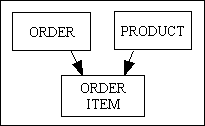
In this situation the LIST 2 screen would cover the ORDER and ORDER_ITEM tables, while the PRODUCT table would be the subject of a POPUP from within the ORDER_ITEM(add) and ORDER_ITEM(update) screens.
If it were ever needed to access the ORDER_ITEM table via a PRODUCT, then this combination would be the subject of a separate LIST 2 screen.
There are working examples of all of these within the RBAC application:
These will allow several database records to be updated at a time, but with minor variations.
| 01 Jun 2021 | Updated several pattern descriptions, such as for LIST2 and LIST3, to indicate where the getForeignKeyValues() function is called. |
| 09 Nov 2020 | Updated the ADD2 pattern to include calls to the setFinalAction() and runImmediateTask() methods. |
| 02 Apr 2020 | Updated the FilePicker pattern to replace the 'directory' entry in $picker_filetypes with the separate $this->picker_include_dir option. |
| 01 Aug 2019 | Updated the MULTI 4 pattern to allow the option for the contents of the outer entity to be constructed via the setScrollArray() method.
Updated the OUTPUT 1 pattern to allow the $dbobject->allow_zero_rows property to be set to TRUE. |
| 02 Feb 2019 | Updated the TREE 1 and TREE 2 patterns to include the ability to add extra columns to the screen.
Added the TREE 3, ADD 6, ADD 7 and LIST 4 patterns. |
| 14 Jul 2019 | Updated FILEPICKER pattern to include the ability to browse through subdirectories. |
| 01 Aug 2018 | Updated OUTPUT 4 pattern to change the selected control from a dropdown list to a checkbox.
Updated TREE 1 and TREE 2 patterns to include call to getExtraData() and getCollapsed() methods. Updated ADD 1 and ADD 2 patterns to include call to changeActionButtons() method. Updated UPDATE 1 pattern to include call to quitButton() method. Updated SEARCH 1 pattern to include call to clearEditableData() method. |
| 03 Aug 2017 | Updated OUTPUT 4 pattern to include columns for sort_seq and label. |
| 01 Feb 2017 | Updated ADD 4 . ADD 5 patterns to show that they can perform updates and deletes as well as inserts.
Updated UPDATE 4, MULTI 2, MULTI 3, MULTI 4, MULTI 5 and MULTI 6 patterns to show that they can perform inserts and deletes as well as updates. |
| 01 Aug 2016 | Amended the ADD1, ADD2 and ADD5 patterns to include a call to the quitButton() method.
Amended FILEPICKER so that it can show video files. |
| 01 Apr 2016 | Amended the File Upload pattern to include a call to the getExtraData() method. |
| 12 Dec 2015 | Amended the OUTPUT 4 pattern to include the ability to save the current selection so that it can be restored on a subsequent visit to the same task. |
| 01 May 2015 | Amended the LIST 3 pattern to allow the $allow_zero_rows property for the middle entity, which will allow the inner entity to be processed even if the middle entity does not return any database rows. |
| 01 Mar 2015 | Amended the File Upload pattern to allow the 'SUBMIT+stay' button, and to return an array of details for each uploaded file. |
| 01 Jul 2014 | Amended the Tree View 1 and Tree View 2 patterns to allow pagination.
Added the Output 6 pattern. |
| 01 Jun 2014 | Amended the Filepicker pattern to use a cache for the directory contents when it contains more than 2000 files. |
| 01 Dec 2013 | Amended the Add 5 and Multi 6 patterns to include a reference to FAQ156. |
| 01 Dec 2013 | Added the Multi 6 pattern. |
| 22 Jun 2013 | Added the Multi 5 pattern. |
| 25 Aug 2011 | Added the Output 5 pattern. |
| 01 Jun 2011 | Added Title & QuickSearch Bar. |
| 01 Jan 2011 | Updated the add to favourites option in the Menu Bar so that it will also save the current menu bar values so that when the task is selected from the list of favourites the menu bar can be reconstituted. |
| 01 Aug 2010 | Updated Menu Bar to include the add to favourites option. |
| 08 Jul 2009 | Updated Search 1 to include a call to the post_search() method. |
| 01 Jun 2009 | Updated Navigation bar to include the row count. |
| 01 May 2009 | Updated File Upload to include a call to the post_fileUpload() method.
Updated Navigation Bar to include the ability to lock the current selection. |
| 01 Jan 2009 | Added Associated/Related Rows. |
| 01 Dec 2008 | Amended the Filepicker pattern to allow the file's size and modification date to be included in the display.
Added the Batch pattern. |
| 01 Nov 2008 | Amended the Pagination and Scrolling areas to make the displays configurable. |
| 01 Oct 2008 | Amended the FilePicker pattern to automatically select any file which is inserted using the FileUpload pattern. |
| 01 Jul 2008 | Added the Output 4 pattern to allow columns to be selected before being output to a CSV file. |
| 01 May 2008 | Added the Add 5 pattern to allow multiple entries to be input on a single screen. |
| 01 Feb 2008 | Amended the Update 1 and Delete 1 patterns to include the ability to restrict processing to the record's creator by using the settings field. |
| 02 Dec 2007 | Amended the File Picker pattern to include the following:
|
| 01 Nov 2007 | Amended the File Upload pattern so that it will call the resizeImage() function if required. |
| 25 Jul 2007 | Amended the Multi4 pattern so that a field which is updated in the parent object can also be passed down to the child object. |
| 01 May 2007 | Added Update5 pattern.
Amended Search1 pattern by adding a call to the _cm_validateSearch() method. |
| 24 Feb 2007 | Amended Popup details to provide more information regarding POPUP 2. |
| 15 Jan 2007 | Amended File Picker and Popup patterns to include a 'Choose Null' button.
Amended Output 2 to include the option of appending a line of accumulated totals and the end of the output. |
| 18 Nov 2006 | Amended File Picker, File Download and File Upload patterns by including some sample code. |
| 26 Oct 2006 | Added the ability to display a Version Number underneath the action bar. |
| 18 Oct 2006 | Amended Introduction to include a link to Radicore for PHP - Tutorial which documents the new procedure whereby new components can be generated by the Data Dictionary component in the framework at the touch of a button. |
| 28 Aug 2006 | Added Output 2 and Output 3 patterns. |
| 12 Aug 2006 | Added Output 1 pattern. |
| 26 Jul 2006 | Added File Download pattern. |
| 14 Jul 2006 | Added Timetable1 pattern. |
| 15 Apr 2006 | Updated Menu Bar to include a "logout (all)" option. |
| 10 Mar 2006 | Updated all details in "Object Calls" to refer to Functions, Methods and Variables.
Added a template for Delete 4. |
| 18 Dec 2005 | Added a template for File Upload.
Added Choosing which template to use. |
| 11 Dec 2005 | Added ERASE 1. |
| 25 June 2005 | Renamed MULTI 3 to MULTI 1 (for one table), MULTI 1 to MULTI 2 (for 2 tables), MULTI 2 to MULTI 3 (for 3 tables), and redefined MULTI 4. Also added LIST 3. |
| 21 June 2005 | Amended Data Area to show options which are available when constructing screen layouts. |
| 08 May 2005 | Added Multi 4. |
| 19 Dec 2004 | Changed the contents of the action bar in ADD 1, ADD 2 and UPDATE 1 screens. |
| 14 Nov 2004 | Changed Popup screens so that when only a single selection is allowed the SELECT column will contain radio buttons instead of checkboxes. |
| 01 Oct 2004 | Added list of object calls to each template. |
| 06 Jun 2004 | Added sections for the Data Area and the Message Area. |
| 28 Apr 2004 | Re-styled all the page layouts. |
| 22 Dec 2003 | Added File Picker. |
| 10 Nov 2003 | Added Add 4, Multi 3, Update 3, Update 4 and Tree View 2.
Added scrolling area to Delete 1, Enquire 1, List 2, Link 1, Multi 2 and Update 1. |
| 23 Sep 2003 | Added sample screen shots for all screens. |
| 08 Sep 2003 | Added new dialog types - Link 1, Multi 1 and Multi 2. |