22nd October 2006
Amended 1st January 2013
In Part 1 of this tutorial I described the steps necessary to deal with a new application which is to be run under the Radicore framework, all of which can be achieved by using functions which are built into the framework. These functions include:
The transaction generation feature is made possible by the fact that every transaction within the Radicore framework is an implementation of one of the many Transaction Patterns. To create a new transaction, or in some cases a whole family of transactions, is a simple 3-step process:
The major difficulty here is that there are over 30 transaction patterns in the catalog, so which one do you choose? There is no simple answer as it depends entirely on the circumstances, a combination of the physical structure and relationship between the database tables, and how they need to be accessed. Although there is some guidance on choosing which pattern to use the purpose of this part of the tutorial is to build a set of transactions around a test database to help explain where particular patterns can be used, and to show how the generated scripts can be customised to suit different circumstances.
The database schema I will use is described here, and has a structure as shown in Figure 1:
Figure 1 - Entity-Relationship Diagram (ERD)
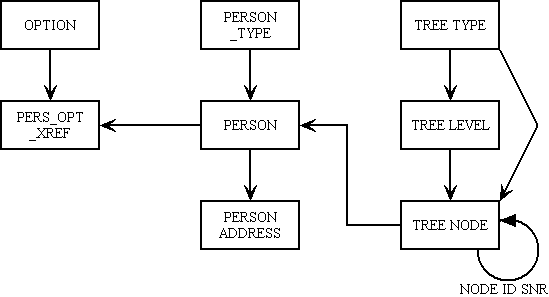
This database was specifically constructed to show how the framework can deal with single tables, one-to-many relationships, many-to-many relationships, and even self-relationships. There is even an implementation of my flexible tree structure.
Here are the steps necessary to build the components to maintain the X_OPTION table within the test database.
| Table | Column | Setting |
|---|---|---|
| x_option | option_id | UPPERCASE |
| created_date | NOEDIT, AUTO-INSERT, NOSEARCH | |
| created_user | NOEDIT, AUTO-INSERT, NOSEARCH | |
| revised_date | NOEDIT, AUTO-UPDATE, NOSEARCH | |
| revised_user | NOEDIT, AUTO-UPDATE, NOSEARCH |
For a description of what these settings mean please refer to Update Column.
After these changes have been made they must be made available to the application by running the Export to PHP function.
We wish to access this transaction directly from a menu, not a navigation bar within another transaction, so we need to create a transaction of type LIST1. Using the Generate Transactions procedure select the X_OPTION table, the LIST1 pattern, then press the SUBMIT button to bring up the screen shown in Figure 2:
Figure 2 - Create LIST1 transaction for the X_OPTION table
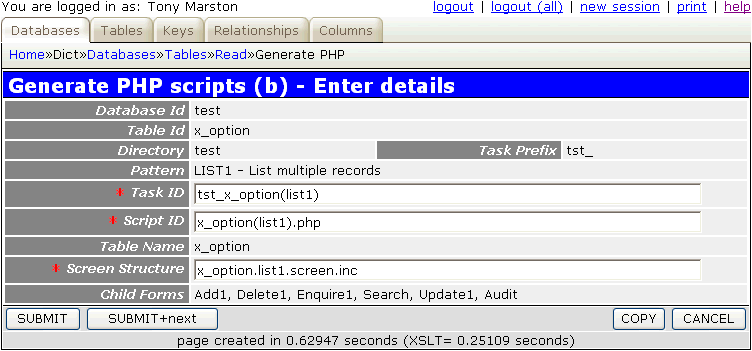
It should not be necessary to change any of these values, so press the SUBMIT button and the following messages should appear:
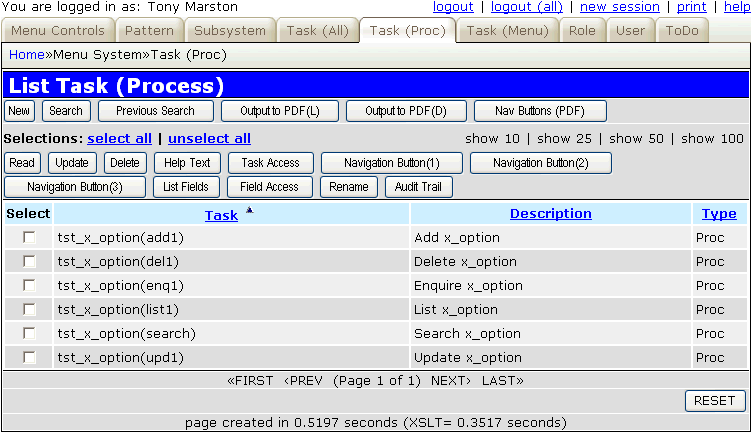
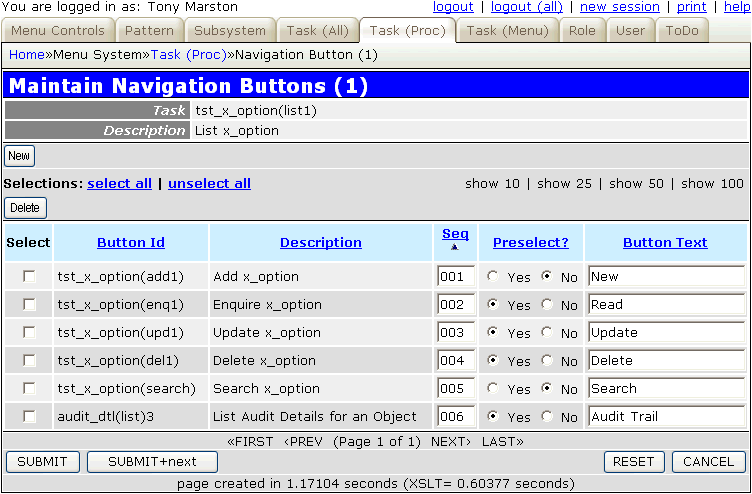
The records which have just been added to the MNU_TASK table are shown in Figure 3:
Figure 3 - additions to the TASK table
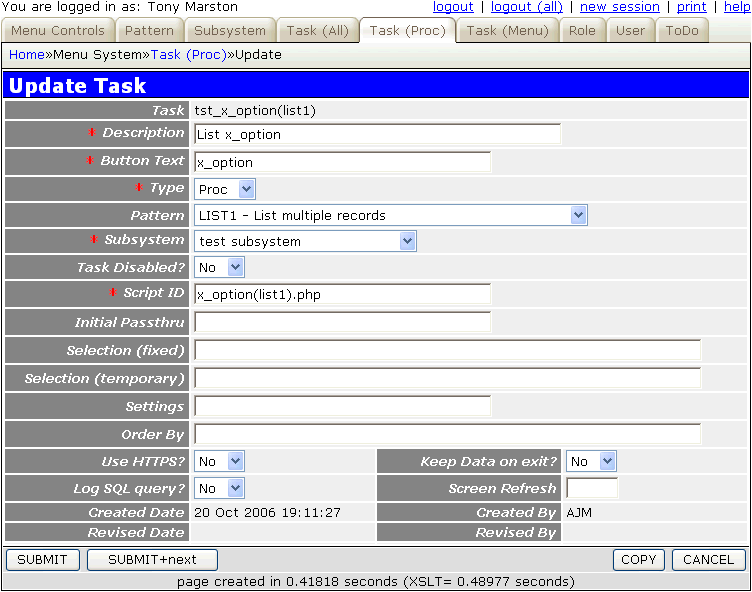
Each of these records has details similar to those which are shown in Figure 4:
Figure 4 - details on the TASK table
The records which have just been added to the MNU_NAV_BUTTON table are shown in Figure 5:
Figure 5 - additions to the NAVIGATION_BUTTON table
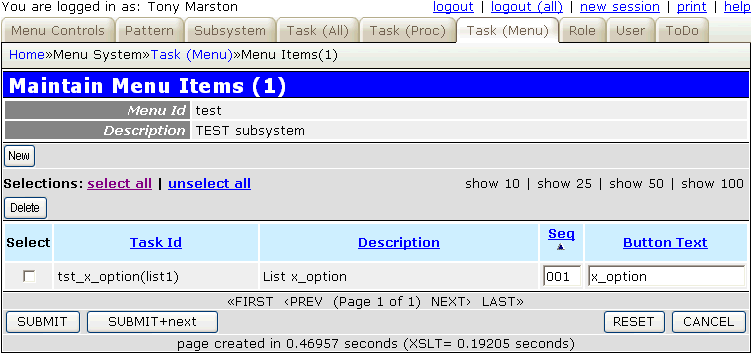
The record which has just been added to the MNU_MENU table is shown in Figure 6:
Figure 6 - addition to the MENU table
The following component scripts will be created in the subsystem directory as defined in the Create Subsystem screen:
<?php
$table_id = 'x_option';                      // table name
$screen   = 'x_option.list1.screen.inc';     // file identifying screen structure
require 'std.list1.inc';                     // activate page controller
?>
<?php
$table_id = 'x_option';                      // table name
$screen   = 'x_option.detail.screen.inc';    // file identifying screen structure
require 'std.add1.inc';                      // activate page controller
?>
<?php
$table_id = 'x_option';                      // table name
$screen   = 'x_option.detail.screen.inc';    // file identifying screen structure
require 'std.del1.inc';                      // activate page controller
?>
<?php
$table_id = 'x_option';                      // table name
$screen   = 'x_option.detail.screen.inc';    // file identifying screen structure
require 'std.enq1.inc';                      // activate page controller
?>
<?php
$table_id = 'x_option';                      // table name
$screen   = 'x_option.detail.screen.inc';    // file identifying screen structure
require 'std.search1.inc';                   // activate page controller
?>
<?php
$table_id = 'x_option';                      // table name
$screen   = 'x_option.detail.screen.inc';    // file identifying screen structure
require 'std.upd1.inc';                      // activate page controller
?>
Please note the following:
The following screen structure scripts will be created in the <subsystem>/screens/<language> directory where <language> is the default language code as selected in the Update Control Data screen.
<?php
$structure['xsl_file'] = 'std.list1.xsl';

$structure['tables']['main'] = 'x_option';

// identify the column specs - may use 'width' or 'class'
$structure['main']['columns'][] = array('width' => 5);
$structure['main']['columns'][] = array('width' => '16.67%');
$structure['main']['columns'][] = array('width' => '16.67%');
$structure['main']['columns'][] = array('width' => '16.67%');
$structure['main']['columns'][] = array('width' => '16.67%');
$structure['main']['columns'][] = array('width' => '16.67%');
$structure['main']['columns'][] = array('width' => '16.67%');

// identify the field names and their screen labels
$structure['main']['fields'][] = array('selectbox' => 'Select');
$structure['main']['fields'][] = array('option_id' => 'Option Id');
$structure['main']['fields'][] = array('option_desc' => 'Option Desc');
$structure['main']['fields'][] = array('created_date' => 'Created Date');
$structure['main']['fields'][] = array('created_user' => 'Created User');
$structure['main']['fields'][] = array('revised_date' => 'Revised Date');
$structure['main']['fields'][] = array('revised_user' => 'Revised User');
?>
<?php
$structure['xsl_file'] = 'std.detail1.xsl';

$structure['tables']['main'] = 'x_option';

// identify the column specs - may use 'width' or 'class'
$structure['main']['columns'][] = array('width' => '25%');
$structure['main']['columns'][] = array('width' => '*');

// identify the contents of each row in the table
$structure['main']['fields'][] = array('selectbox' => 'Select');
$structure['main']['fields'][] = array('option_id' => 'Option Id');
$structure['main']['fields'][] = array('option_desc' => 'Option Desc');
$structure['main']['fields'][] = array('created_date' => 'Created Date');
$structure['main']['fields'][] = array('created_user' => 'Created User');
$structure['main']['fields'][] = array('revised_date' => 'Revised Date');
$structure['main']['fields'][] = array('revised_user' => 'Revised User');
?>
Please note that by default these files contain entries for every field which is currently available in the data dictionary for the specified database table. These files may be adjusted as necessary.
The parent screen can now be accessed from the menu bar, as shown in Figure 7:
Figure 7 - running the parent LIST screen
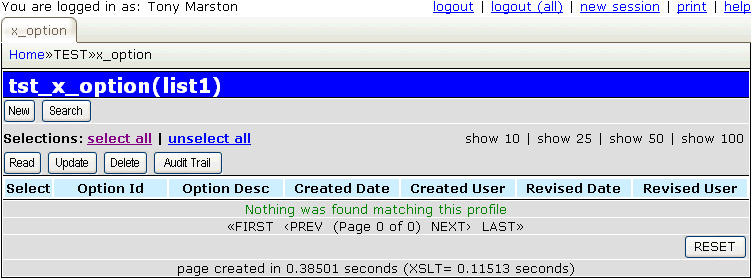
There are currently no records to display, so to add entries you must press the New button, which will bring up the screen shown in Figure 8:
Figure 8 - running the child ADD screen
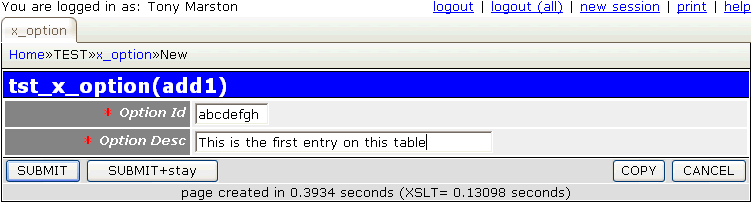
Fill in the details and press the SUBMIT button which will return to the previous screen as shown in Figure 9:
Figure 9 - returning to the parent LIST screen
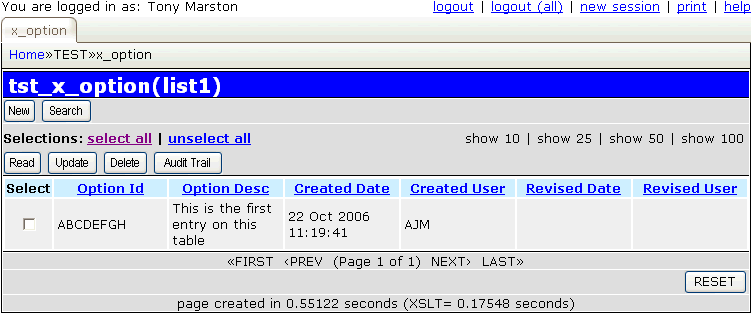
Notice how the value for OPTION_ID has been shifted into upper case, and the values for CREATED_DATE and CREATED_USER have been automatically filled in. This is because of the dictionary settings from step 1.
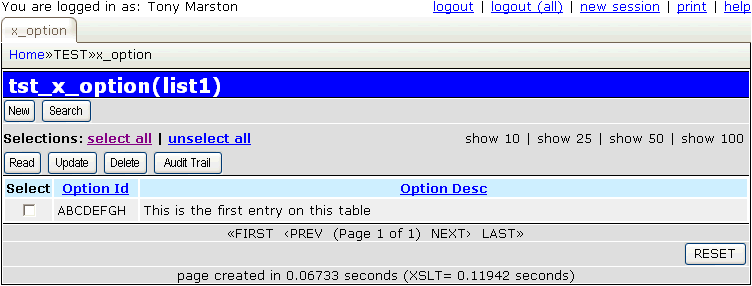
The generated screen structure files will specify all the fields from each table, but the default layout can easily be changed. For example, in Figure 9 it may be a good idea to remove some unimportant fields. This can be done by editing file x_option.list1.screen.inc to produce the following:
<?php
$structure['xsl_file'] = 'std.list1.xsl';

$structure['tables']['main'] = 'x_option';

// identify the column specs - may use 'width' or 'class'
$structure['main']['columns'][] = array('width' => 5);
$structure['main']['columns'][] = array('width' => 80);
$structure['main']['columns'][] = array('width' => '*');

// identify the field names and their screen labels
$structure['main']['fields'][] = array('selectbox' => 'Select');
$structure['main']['fields'][] = array('option_id' => 'Id');
$structure['main']['fields'][] = array('option_desc' => 'Description');
?>
This will produce the result shown in Figure 10. The full list of editing options is documented in The MVC Design Pattern - XSL Structure file.
Figure 10 - the modified LIST screen
The text that is provided for screen labels and buttons may not be exactly to your liking, so you will need to know how it can be customised. The first thing you need to know is from where the different pieces of text originate:
Note that in order to provide the ability to supply these different pieces of text in different languages, the Radicore framework has an Internationalisation (I18N) feature which means that this text is actually extracted from a file called language_text.inc. There should be a copy of this file in the <subsys_dir>/text/<language> subdirectory where <language> is the language code(s) that you wish to support.
Although an initial version is copied across for you during the Build Directory process, this default file only contains blank entries for error messages, and nothing for the remainder. However, after amending the contents of the MENU database you can run the Export Subsystem function in order to create a text file called <subsys_dir>/text/<subsys_id>.menu_export.txt. This will contain similar to the following:
// file created on October 22, 2006, 3:58 pm

// menu details for subsystem TEST
$array['x_option']                          = 'x_option';

// navigation button details for subsystem TEST
$array['Delete']                            = 'Delete';
$array['New']                               = 'New';
$array['Read']                              = 'Read';
$array['Search']                            = 'Search';
$array['Update']                            = 'Update';

// finished
These entries can be copied directly into the language_text.inc file. Note that this does not include any field labels which you can leave in the relevant screen structure files. If you wish to support multiple languages you can either copy these field labels from the screen structure files into the language_text.inc file, or you can create different versions of the screen structure files in the relevant <subsys_dir>/screens/<language> subdirectories.
This feature means that providing screen text in another language is very simple:
<subsys_dir>/screens/<language> subdiectory using the language code you wish to support.You can now use this transaction to enter your own data, or you can use existing data from the xample database which is contained within file radicore/xample/sql/mysql/xample-data.sql
In Part 3 of this article I shall create more transactions for more tables.
| 01 Jan 2013 | Modified Step 5 to remove the need to copy screen titles to a non-database file. |